Introduction
Introduction Last year I got my hands on the 96Boards Carbon by SeeedStudio thanks to a giveaway at the Las Vegas Linaro Connect. I had no idea at the time what I was going to do with it, but I picked it up thinking that it will encourage me to use and hopefully contribute to the Zephyr Project.
I did nothing of that sort however and the board gathered dust until earlier this year, when Kushal and I talked about getting micropython up on the Carbon. I finally dusted off my Carbon and built micropython on it and demonstrated the board at FOSSAsia during a session Kushal Das did on micropython and NodeMCU. Kushal then followed up with a blog post with a nicer Hello World blinky program than I wrote.
We still did not get the Bluetooth ® wireless technology working on the Carbon and after a lot of searching I found out that it needed flashing the nRF51 chip on the board. I am a relative noob in the embedded world, and after quite a bit of struggling I found out that the cheapest way for me to do that was to purchase an ST-Link V2 programmer and use it to flash. I did the purchase and once again by the time the programmer arrived, life had taken over and now it was the programmer’s turn to gather dust.
This was until the reserved-bit makerspace started hosting IoT meetups and I did the Hello World demo with the Carbon. I finally had the inspiration I needed to bring the Carbon to life to make it do what it was supposed to do - talk to other devices over Bluetooth.
Getting Started
The 96Boards Carbon is manufactured by SeeedStudio and has two chips on it, an ARM Cortex M4 for your programs and an nRF51 chip for the BLE, 512K of on-board flash and a 30-pin expansion header capable of 3.3V digital and analog GPIO. The board is supported by the Zephyr Project, which is what we will use to bring the board to life.
- For this post, we will do two very simple things:
- Enable Bluetooth on the Carbon
- Make the Carbon into a simple beacon
Bluetooth on the Carbon
The Zephyr project has a number of Bluetooth examples in their sample projects but none of them work out of the box for the Carbon because the nRF51 chip has not been programmed to talk to the main controller. That is the first thing we need to do and it is quite straightforward to do if you have the right support equipment. What you need are:
- An ST-Link V2 programmer. There are different variants available, so choose one that’s cheapest and most easily available in your region
- Dupont connector pins, aka jumper pins to connect the programmer with the connectors on the board
- A breadboard to secure the male connectors onto the Carbon. Alternatively you may solder a jumper header onto the Carbon, but I did not want to do that for my very first experiment with this boards - Carbons are not easy to import into India!
Your software requirements are as follows:
- OpenOCD: This should be available in the repositories of most popular Linux distributions. I use Fedora 25 and can verify that the openocd package on that works fine for this demo
- Zephyr: Get the sources from here and follow the instructions on the Zephyr Project documentation to set up the SDK needed to build Zephyr
- dfu-util: This should again be available in the repositories of most popular Linux distributions.
Step 0. Build Zephyr for the nRF51 chip
The Zephyr project has a number of samples and one of those samples - hci_spi - is used to enable the nRF51 chip to talk to the main Cortex M4 chip over SPI. We need to build this project and then burn it on the nRF51 chip. To do this, run the following command from the zephyr sources directory. It is assumed that your development environment is set up, i.e. you have the SDK installed and you have sourced zephyr-env.sh.
        $ make -C samples/bluetooth/hci_spi/ \
            CONF_FILE=96b_carbon_nrf51.conf \
            BOARD=96b_carbon_nrf51
Here, the BOARD and CONF_FILE options specify the target chip for Zephyr, which is the Carbon nRF51 chip. The build should end successfully and produce a zephyr.hex file in samples/bluetooth/hci_spi/outdir/96b_carbon_nrf51.
That is it, you now have a Zephyr image that you can flash onto the nRF51 chip.
Step 1. Connect the Carbon with the ST-Link V2 programmer
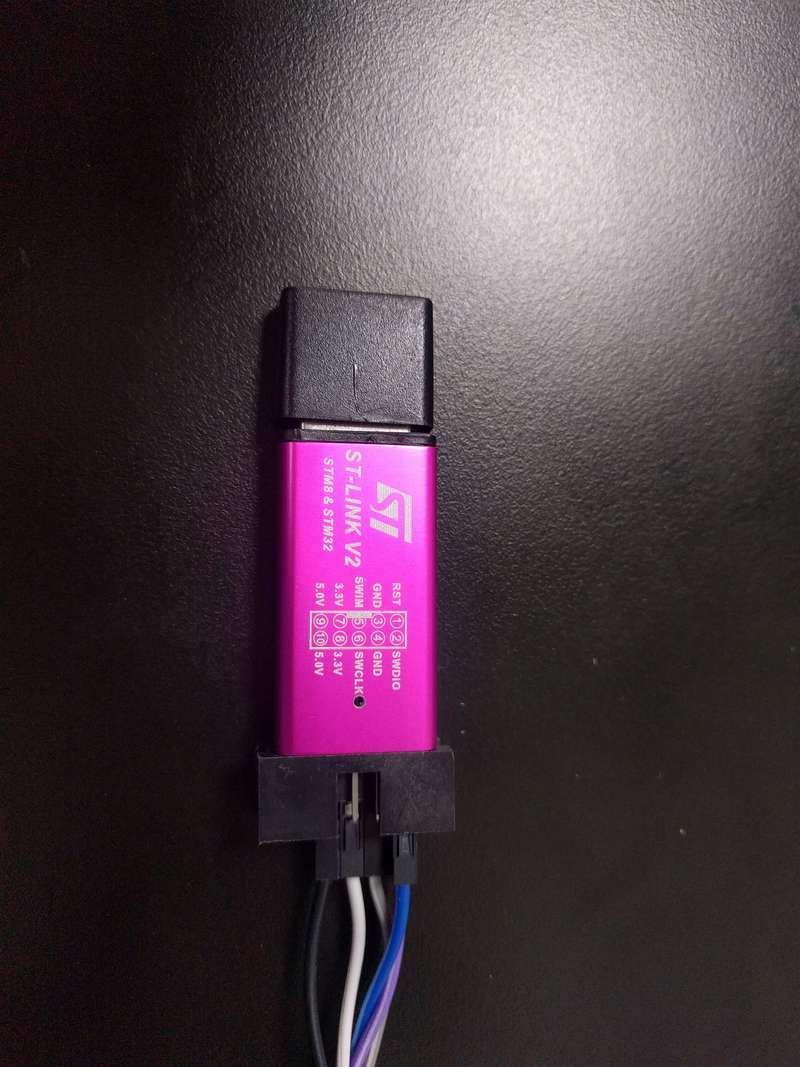
The connections from the board to the programmer are pretty straightforward. The programmer I used has a pinout on the side like so:

The programmer connects to the upper row of pins (we’ll call it the BLE header) next to the Reset and Boot buttons on the BLE Carbon. The row can be identified by the BLE written on the top left corner of that row.
The pins 1, 2, 4, 6, 8 (i.e. RST, SWDIO, GND, SWCLK and 3.3V) on the programmer to the BLE header from right to left. The names should match, so RST to RST, SWDIO to DIO and so on. Here is how the connection looks like in the end:

Once you have this connection and your programmer plugged into your laptop, you’re ready to program the nRF51 chip.
Step 2. Flash Zephyr
In this step, we use OpenOCD to flash Zephyr onto the nRF51 chip. To do this, create a file called carbon-nrf51-stlink-v2.cfg with the following contents:
source [find interface/stlink-v2.cfg]
transport select hla_swd

set WORKAREASIZE 0x4000
source [find target/nrf51.cfg]
Now with the programmer connected and the board powered on, Start the OpenOCD server using this command:
$ sudo openocd -f carbon-nrf51-stlink-v2.cfg
This should start the OpenOCD server successfully:
Open On-Chip Debugger 0.10.0
Licensed under GNU GPL v2
For bug reports, read
    http://openocd.org/doc/doxygen/bugs.html
Info : The selected transport took over low-level target control. The results might differ compared to plain JTAG/SWD
adapter speed: 1000 kHz
Info : Unable to match requested speed 1000 kHz, using 950 kHz
Info : Unable to match requested speed 1000 kHz, using 950 kHz
Info : clock speed 950 kHz
Info : STLINK v2 JTAG v17 API v2 SWIM v4 VID 0x0483 PID 0x3748
Info : using stlink api v2
Info : Target voltage: 3.254881
Info : nrf51.cpu: hardware has 4 breakpoints, 2 watchpoints
Info : accepting 'telnet' connection on tcp/4444
target halted due to debug-request, current mode: Thread
xPSR: 0xc1000000 pc: 0x0000b1c0 msp: 0x20007ff8
** Programming Started **
Now from another terminal, connect to the OpenOCD server over telnet:
$ telnet localhost 4444
and then proceed to flash Zephyr using the following command at the telnet prompt: program /home/siddhesh/src/upstream/zephyr/zephyr-project/samples/bluetooth/hci_spi/outdir/96b_carbon_nrf51/zephyr.hex verify
The program command needs the absolute path; a relative path will fail. Type exit to exit the telnet session.
That’s it, your nRF51 chip should now be configured to talk to your main chip, so lets proceed to write a simple bluetooth beacon to test it.
A Beacon of life!
Now that the Bluetooth firmware is alive, proceed to build the beacon sample program in the samples/bluetooth/beacon directory in zephyr, but for the Carbon board and not the nRF51 chip:
make -C samples/bluetooth/beacon BOARD=96b_carbon
We will now use the dfu-util utility to flash outdir/96b_carbon/zephyr.bin (not zephyr.hex as in the previous case!) on the Carbon. First we connect the Carbon to our laptop using the OTG port and then set it to bootloader mode by holding down the BOOT0 button and pressing the RESET button. To verify that the board has entered bootloader mode, use dfu-util and ensure that you get this as the output:
$ sudo dfu-util -l
dfu-util 0.9

Copyright 2005-2009 Weston Schmidt, Harald Welte and OpenMoko Inc.
Copyright 2010-2016 Tormod Volden and Stefan Schmidt
This program is Free Software and has ABSOLUTELY NO WARRANTY
Please report bugs to http://sourceforge.net/p/dfu-util/tickets/

Found DFU: [0483:df11] ver=2200, devnum=20, cfg=1, intf=0, path="2-2", alt=3, name="@Device Feature/0xFFFF0000/01*004 e", serial="387838933234"
Found DFU: [0483:df11] ver=2200, devnum=20, cfg=1, intf=0, path="2-2", alt=2, name="@OTP Memory /0x1FFF7800/01*512 e,01*016 e", serial="387838933234"
Found DFU: [0483:df11] ver=2200, devnum=20, cfg=1, intf=0, path="2-2", alt=1, name="@Option Bytes  /0x1FFFC000/01*016 e", serial="387838933234"
Found DFU: [0483:df11] ver=2200, devnum=20, cfg=1, intf=0, path="2-2", alt=0, name="@Internal Flash  /0x08000000/04*016Kg,01*064Kg,03*128Kg", serial="387838933234"
We see that the device name is [0483:df11] and we will use this to flash the zephyr image on the Carbon as follows:
$ sudo dfu-util -d [0483:df11] -a 0 -D outdir/96b_carbon/zephyr.bin -s 0x08000000
Once that ends successfully, reset the board and you have a working beacon!
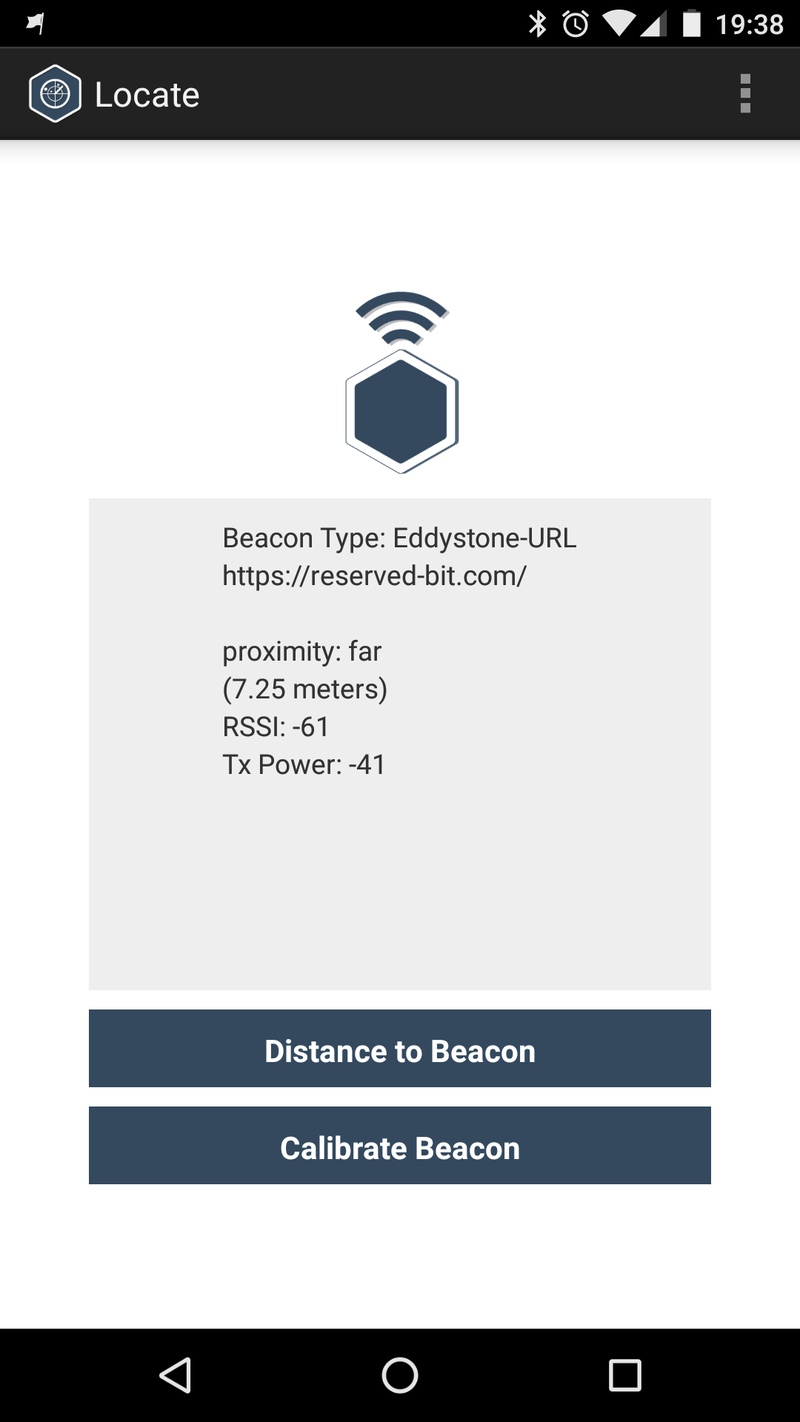
You can verify that the beacon works by using one of the many Locator apps in Android. Here’s what mine shows; I modified the URL to (shamelessly) promote our local makerspace.

Conclusion
With this my Carbon is finally alive and ready for a proper IoT project. Next in my plan is to use the Carbon to control a relay so that we can turn lights on and off at our makerspace. For that project we will write some real (or maybe even micropython!) code, so it will be far more exciting. Now I only need to get that project together before the (now alive) Carbon starts gathering dust again!
Additional Resources
| Siddhesh Poyarekar: Twitter | Home Page |


