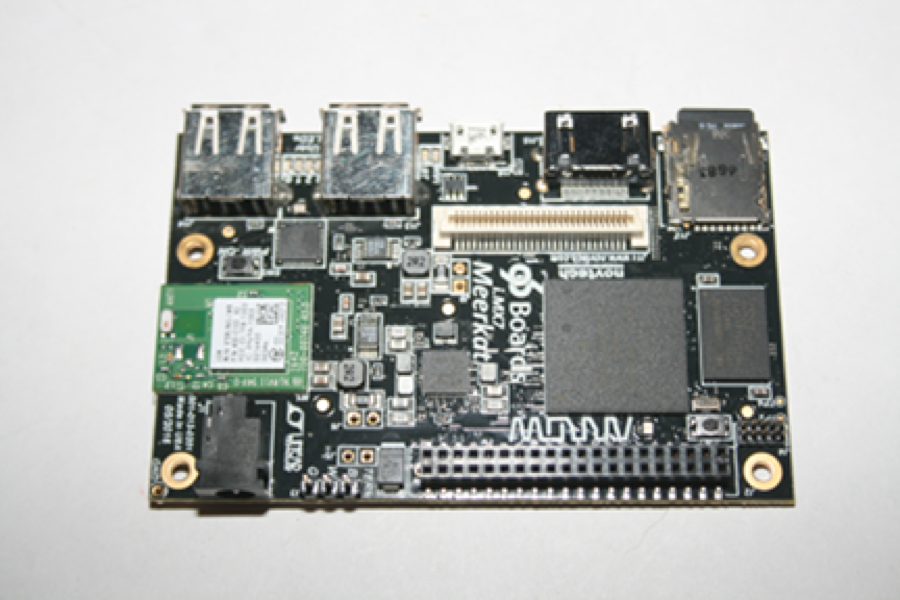
i.MX7 96Board - Meerkat® User Guide
Registering Meerkat®
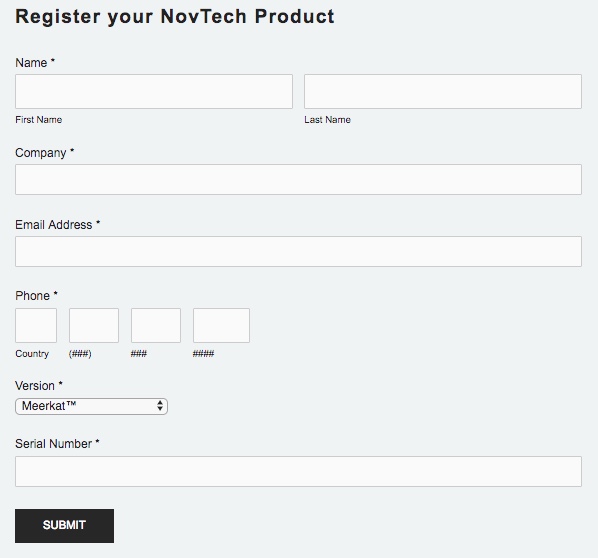
- Please register your i.MX7 96Boards - Meerkat® here.
- Provide the serial # from the back side of Meerkat® board.
- Provide the requested information and select Meerkat from the version drop down.
Download Support files
Support files can be downloaded from here.
This location contains documents, schematics, installable tools and a Virtual Machine pre-configured with tools to speed application development.
See the Read Me First.txt file located there for additional information.
Note that there are two distributions provided for the i.MX7 96Boards - Meerkat®:
- A graphical system with xfce and enlightenment based on Angstrom. Full source code, recipes and pre-compiled images are provided.
- A simple system with a command console. Full source code, a configured build-root and pre-compiled images are provided.
Installing the tools
Introduction and Prerequisites
The following prerequisites are required:
- PC with VMware Player 12 or higher
- PC with ability to open .7z zip files, ie. 7Zip
- PC with 50G+ available hard drive space.
- PC with sufficient RAM to allocate 4GB to the VM.
- Meerkat® VMware® virtual machine, .7z compressed file provided by NovTech
- SD/MMC card programming software, such as Win32DiskImager, “dd” or equivalent.
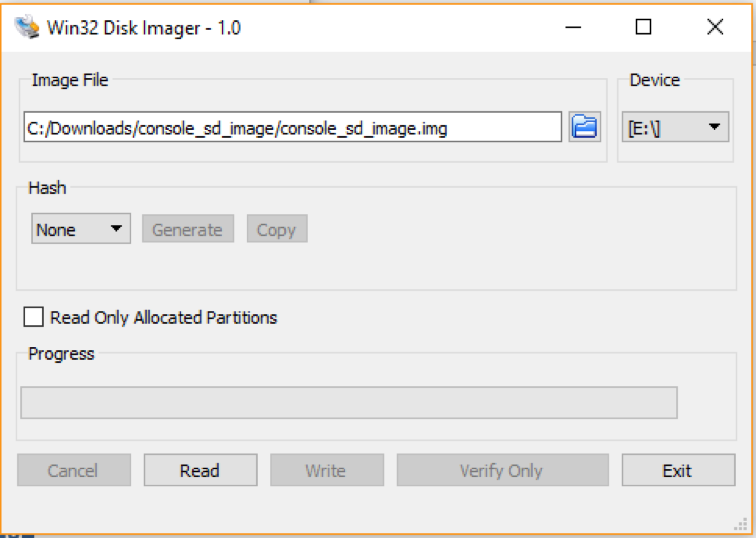
Creating boot cards from pre-compiled images
Pre-compiled boot images are provided on the ShareFile site. To program one of these images to a card for use in the system, use a program like Win32DiskImager.
To create a card with Win32DiskImager:
-
Download and decompress the desired image from the 03 – Compiled SD Images directory on the ShareFile site.
-
Insert a SD/MMC card of at least 4GB size. The contents of this card will be destroyed in the programming process, so be sure to back up any important data.
-
Run the Win32 Disk Imager software, and within the Image File block of the tool, browse to the decompressed disk image.
-
Select the drive letter which corresponds to the SD/MMC card inserted on your PC.
-
If you are satisfied with your selections, select “Write” from the bottom center of the Win32 Disk Imager window. Writing the card will take several minutes, refer to the progress bar on the window for status.
Installing i.MX7 96Boards - Meerkat® Virtual Machine
Updating and recompiling the images will require access to a properly configured Linux machine. A virtual machine has been provided with the Meerkat® to speed your development. Refer to the Software Guide for the Meerkat® for further information on compilation.
Once all prerequisites are met, using 7Zip or any acceptable unzip program, unzip the NovTech_VM_U14.04.4_Meerkat.7z file to your PC hard drive. After unzipping, navigate to the created folder NovTech_VM_U14.04.4_Meerkat. Double Click on the file NovTech_VM_U14.04.4.vmx. VMware® Player should load the virtual machine. Another method could be to open VMware Player and click on ‘Open a Virtual Machine’ then navigate to the NovTech_VM_U14.04.4_Meerkat folder to find the virtual machine setup file.
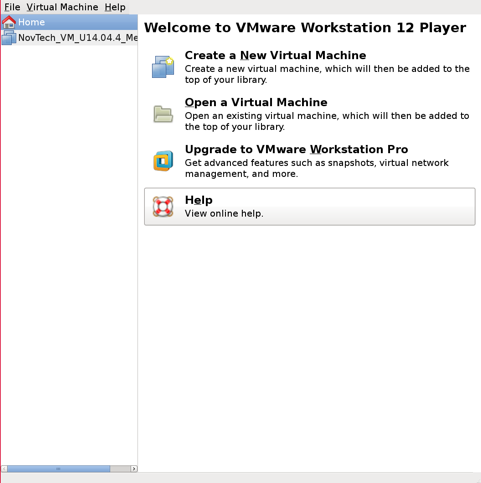 VMware® Player Open Virtual Machine
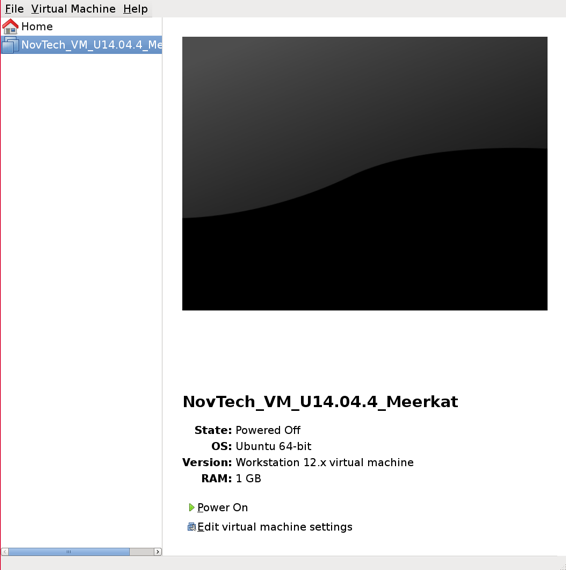 VMware® Player Select Virtual Machine
To save on storage and transmission, the Meerkat<sup®</sup> virtual machine is preconfigured to use 1G of RAM. NovTech recommends increasing this value to a minimum of 2GB. You can edit this value to increase or decrease the amount of RAM assigned to the VM. After opening VMware® Player, click on Edit Virtual Machine Settings, navigate to Hardware tab and select Memory. Adjust memory to the desired size.
Configure the RAM dedicated to your VM.
To minimize the size of the VM image in storage and transit, the VM has been limited to 1GB of RAM. For optimal performance, increase the amount of RAM allocated to the VM. NovTech recommends allocating a minimum of 2GB of memory to the machine, and optimally 6GB of RAM.
This setting is under Virtual machine->virtual machine settings->hardware, and can be modified when the virtual machine has been powered off.
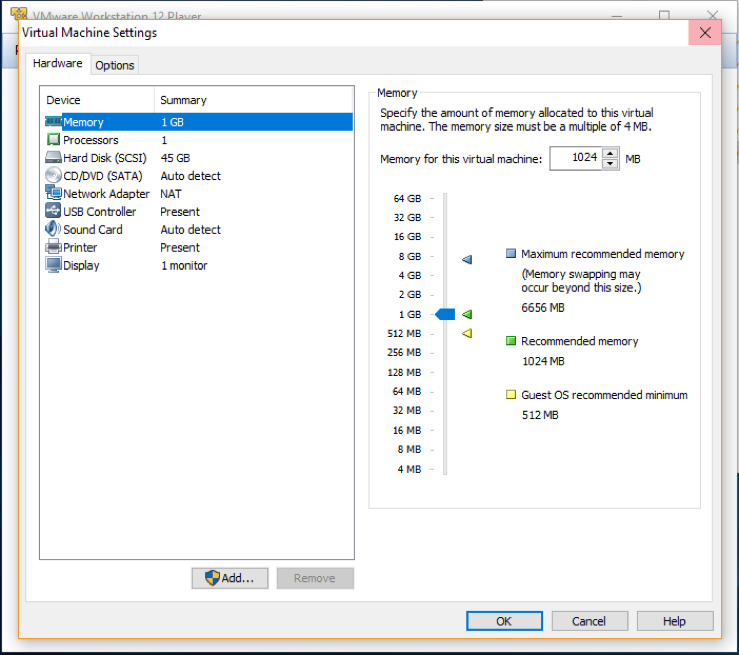
Virtual Machine settings window Note: Allocating more than ¼ of the physical ram on your machine to the VM will degrade overall performance and may cause issues.
You can modify other setting from this window. Once the Virtual Machine starts for the first time, you will be asked to choose whether you Moved it or Copied it. Please select the Moved it option.
Logging into the VM
To log into the virtual machine please type novtech for the password.
Note: A pop-up window may ask you to update the VMware® Linux Tools. It is not necessary to do so, but if you wish to stop seeing the message tab on the bottom of the VM, click ‘Install’ button when asked. VMware® will then mount a CD drive and open the mounted folder with the install files contained in that folder. Copy all the files in that folder and paste them in your home folder. Open a Terminal window where you placed the files. Run these two commands:
sudo chmod 777 auto*.sh
Enter the novtech password when prompted. To install the tools run:
sudo ./autorun.sh
After installation is complete you can delete the files from the folder and eject the CD drive that VMware® auto mounted. This should remove the tab on the bottom of the VM, notifying you about the VMware Linux Tools install.
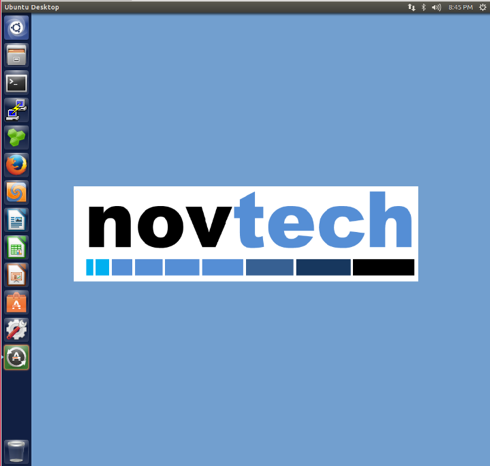 Meerkat® Virtual Machine Desktop Screen.
Contents of the Virtual Machine Desktop
Along the left side of desktop are multiple icons:
-
Search for software on computer and online:

-
File Manager

- Terminal

- Putty - Serial Terminal Tool

- GHex - Hex Editor

- Meld - Code Comparison Tool

- Firefox

- Libre Office Writer

_ Libre Office Calc

- Libre Office Impress

- Ubuntu Software Center - update and install Ubuntu software packages

- System settings

Meerkat Overview
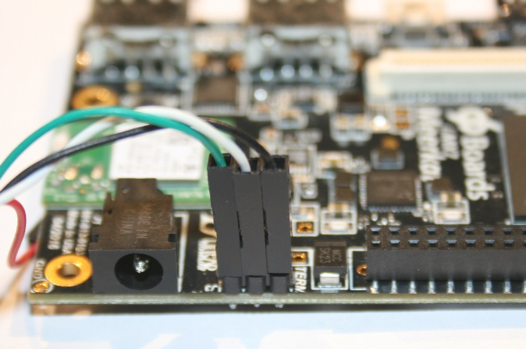
Serial Connections
The supplied cable connects to the Meerkat as follows:
Booting i.MX7 96 - Meerkat®
Hardware Setup
To setup the Meerkat® board for booting, follow these steps:
- Plug in supplied USB cable to the UART port on the board and connect to PC. Verify the USB serial driver is found.
- Insert the SD card into the SD slot.
Serial Console Setup
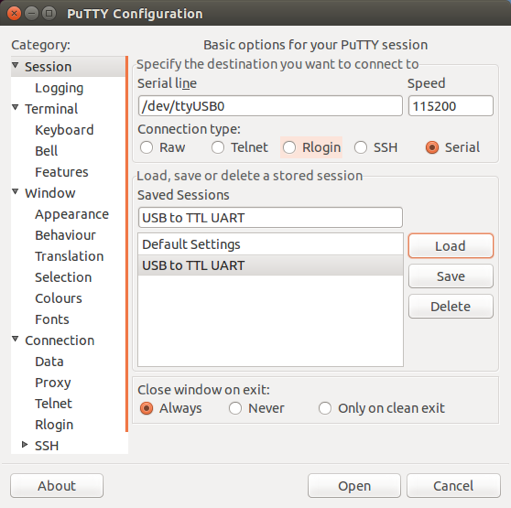
Open a Serial Terminal like Hyper-Terminal, putty or UConn, with settings of 115200, 8, N, 1. For convenience, putty and a preconfigured settings file are provided in the supplied Virtual Machine (available from the download link as indicated in section 2).
The VM provides a preinstalled environment with tools to speed development.
A link to putty can be found on the desktop
Configure putty to use an 8n1 UART at 115200 bps.
For convenience, a preconfigured setting called “USB to TTL UART” is also provided in the virtual machine.
Power the board
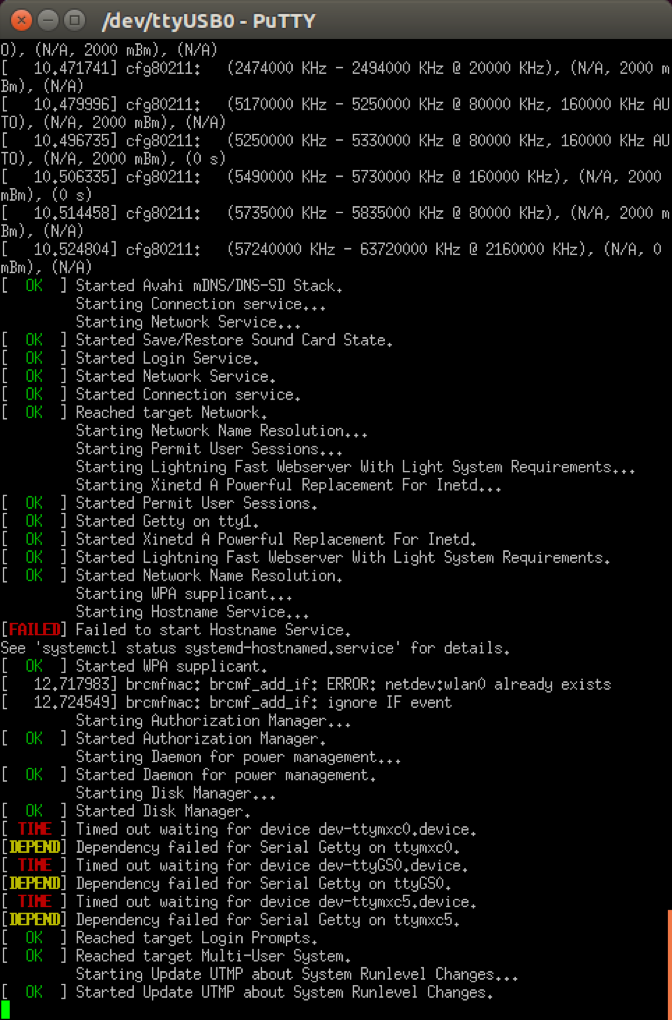
Using the provided power adaptor apply +8 to 18V power to the NovTech Meerkat® Monitoring the serial terminal, you can stop at u-boot or boot all the way into Linux.
Note that for the graphical image, a terminal console is not available and all system control must be done through the graphical interface.
Initial Network Setup
The Meerkat® will need to be configured for your specific wireless network. Once configured, the network will start automatically when the board is powered up.
Graphical Image Networking
The SD card delivered with your Meerkat® has a graphical desktop based on xfce. This desktop will require a mouse and keyboard to navigate. Those can be connected to the USB ports on the Meerkat®.
The networking on this image is managed by connman, but is not enabled by default. If you want wireless networking on your Meerkat®, the connman applet will need to be enabled to start at boot, and configured for your network.
After booting the Meerkat® image per the instructions above, select Applications from the upper left corner of the screen.
Click on: Applications->Settings->Settings Manager
Then select: System->Session and Startup->Application Autostart->Connection Manager.
There should now be a black checkmark next to Connection Manager.
Select Close (close all open settings manager windows).
Power cycle or reset your Meerkat®, the connman applet should be running and visible on the upper right of your screen on your next power up.
When the board comes back up, click on the Applet in the upper and select Preferences, then select your wireless network and click Connect on the right-hand side of the menu. Note that Connect does not look like a button, but text.
If you network requires additional configuration for security, the applet will prompt you for your authentication information.
Console Image Networking
The console image ships with a network configuration that automatically connects to open (unsecure) networks that it finds. If successful, you will see the board retrieve an IP address via DHCP and will be able to ping to an IP address from the command line.
If your network requires additional configuration for security, you will need to provide the credentials for your network. This is accomplished from the Meerkat® console with the wpa_passphrase tool as follows:
wpa_passphrase YOURNET yourpassphrase >> /etc/wpa_supplicant.conf
which will append an entry similar to the following to your /etc/wpa_supplicant.conf file:
network={
        ssid="YOURNET"
        #psk="yourpassphrase"
        psk=0d0992b62e7ce466b47aef8ea26fcd77421f6498f225419b40364c1b4441d08d
}
NOTE: Remember to replace YOURNET and yourpassphrase with the information specific to your network.