OpenFace Demo
For this demo you will need:
Software:
- OpenCV
- Dlib
- Torch
Hardware;
- 96Boards Hikey
- USB Webcam
- Bluetooth ® wireless technology Speaker
- Computer with OpenFace Installed (for classifier training)
References:
https://cmusatyalab.github.io/openface/demo-3-classifier/
https://github.com/96boards/projects/tree/master/home_surveillance/part-2
Part 1, Images to Train the Classifier:
Before running the demo if you are using a UART or SSH connection you must export the display, and turn off the screen saver power options:
$ export DISPLAY=:0
$ xset s off
$ xset -dpms
Using USB webcam and the dataset.py file from home surveillance part 2 written by Mani, we can create a dataset folder with 30 images for each user as a training set for the classifier.
If you already have a dataset with images (possibly downloaded from the internet) you can skip directly to the OpenFace: Image Alignment step after creating the demo directory with the features and aligned subdirectories.
Download the 96boards/project directory from github, and set up your demo folder:
$ git clone https://github.com/96boards-projects/home_surveillance.git
$ cd home_surveillance/part-2
$ mkdr ~/demo
$ cp datset.py haarcascade_frontalface_default.xml ~/demo
$ cd ~/demo
$ mkdir dataset
$ mkdir features
$ mkdir aligned
To capture images have a usb webcam plugged in, and execute the following command while facing the camera:
$ python dataset.py
Enter any number as the ID: this will create 30 images in the dataset directory with the label User.1.[0-30].jpg. Repeat with all of the people you wish to train the dataset with, giving each a unique ID.
Within the dataset directory make a new directory for each user, labeled with the user name:
$ mkdir NAME
Then move all pictures of each user into their corresponding name:
$ mv User.ID* NAME
Where ID is the number that corresponds to each name.
OpenFace: Image Alignment
The following is from the openface base directory)
$ cd ~/openface
Run the following to align the images:
$ ./util/align-dlib.py ~/demo/dataset align outerEyesAndNose ~/demo/aligned --size 96
OpenFace: Training Classifier (on host machine not hikey)
Training a classifier currently needs more processing power than is available to the Hikey. In order to train your classifier you must have another computer which is running Openface and copy the demo directory over to it temporarily.
Once you have copied the demo directory to another device running Openface, execute the following from the base openface directory.
$ ./batch-represent/main.lua -outDir <path-to-demo-directory>/features -data <path-to-demo-directory>/aligned
This command will add the files labels.csv and reps.csv to the features directory. Next copy the demo directory back to the hikey, replacing the old one.
OpenFace: Creating the Classifier (back to hikey)
From the base Openface directory run the following
$ ./demos/classifier.py train ~/demo/features
This will create a classifier.pkl file in the features directory which will be referenced when executing the program.
Espeak
In this demo a tool called Espeak was used in conjunction with a Bluetooth speaker to have the recognized name, or unrecognized unknown said aloud through a speaker.
First download Espeak: $ sudo apt-get install espeak
Espeak can be used through the command line with the command $ espeak ‘text’ , or it can be used through the use of its python api.
In order to make the demo say the recognized name, we must add a few lines to the classifier_webcam.py file in OpenFace.
$ vim demos/classifier_webcam.py
Add the following line to the import statements:
from espeak import speak
Next above the while statement on line 192, add the following variable tempname:
tempname = “”
Finally above the cv2.putText() command on line 216 add the following:
if  str(persons) != tempName:
	espeak.synth(str(persons))
	tempName = str(persons)
This causes Espeak to produce the identifier it contains in persons, as long as the confidence is above 50%.
Linking to a Bluetooth Speaker
In order to link to a Bluetooth speaker it is much easier to use a keyboard and mouse and do so through the desktop display. Click on the Bluetooth icon on the bottom right hand corner of the screen and turn Bluetooth on. Next click Setup New Device and pair it with your Bluetooth speaker.
To test that your speaker is working type the following in the command line:
$ espeak “hello”
If you’re speaker does not say “hello” go to Problems With Bluetooth.
Running the Demo With Your Classifier
Finally execute the following command from the base Openface directory, to run the demo with a live webcam feed:
$./demos/classifier_webcam.py ~/demo/features//classifier.pkl
For linaro connect demo use: $ ./demos/classifier_webcamDemo.py ~/demo/features//classifier.pkl
Problems With Bluetooth
If Bluetooth is on, but not producing any noise, go to the Sound & Video tab and click on PulseAudio Volume Control. Under the Output Device tab your Bluetooth speaker should appear. Make sure that the icon with the green circle and white checkmark on the right, labeled set as fallback, is set.
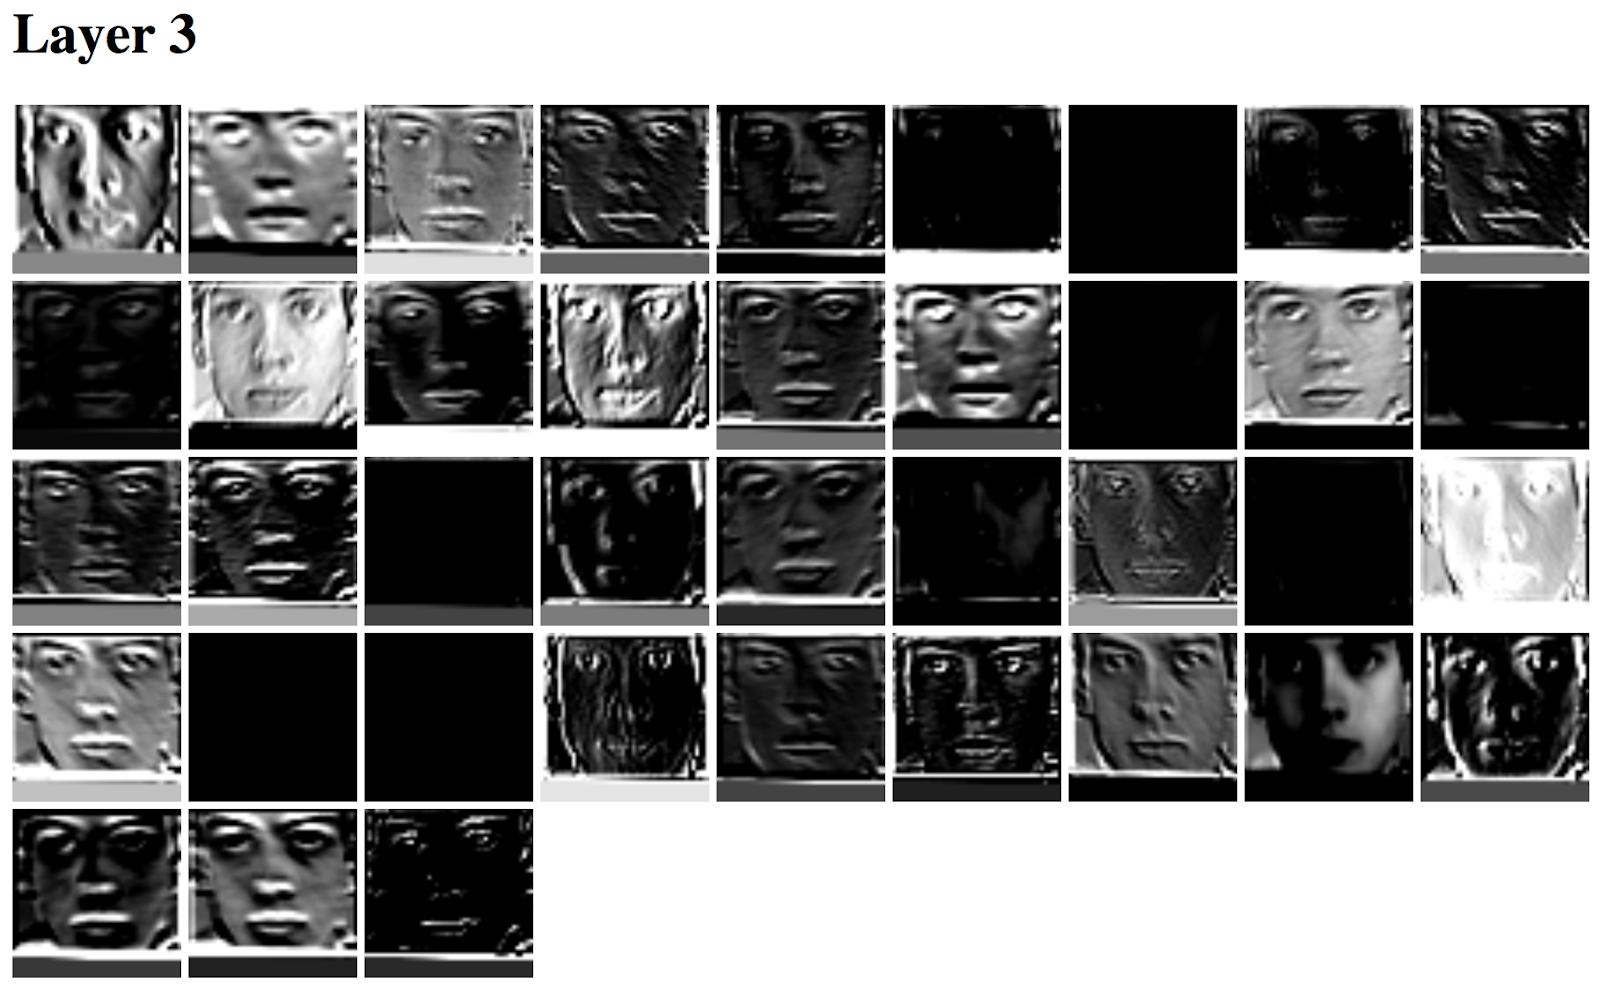
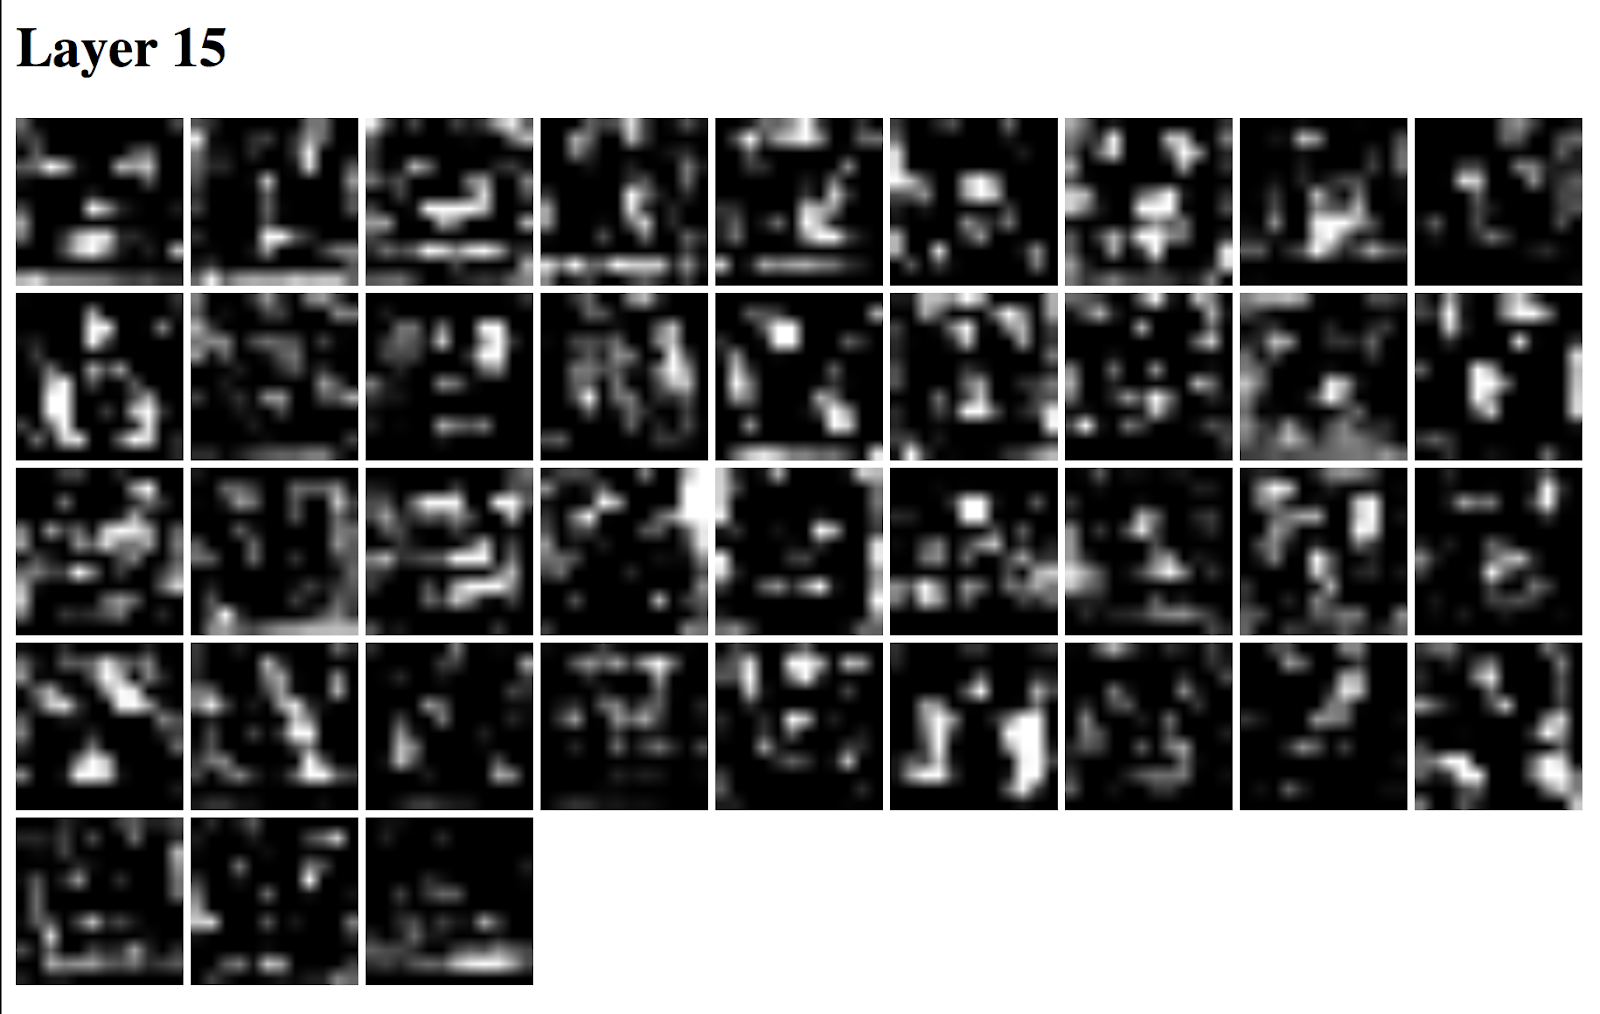
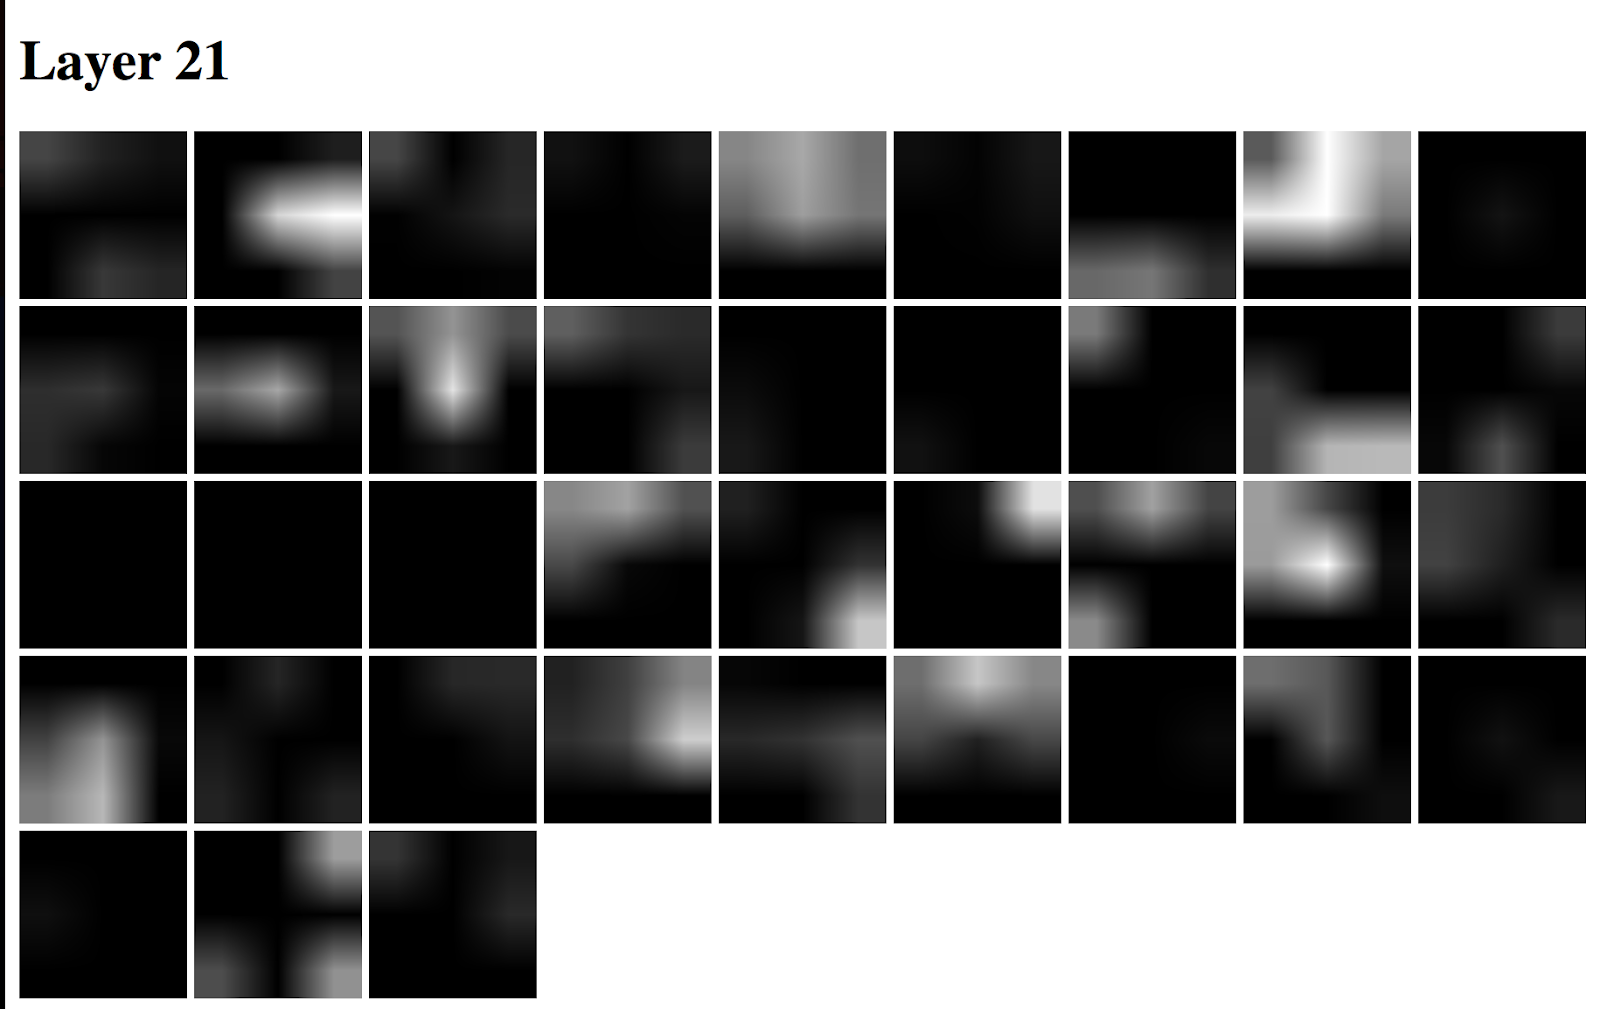
Visualizations of the Output Feature Maps of Each Layer
The following shows the first 39 filters of convolutional layers on the image displayed in the alignment phase.