
Introduction
In our previous post of the “96boards: Autoware everywhere” blog series we introduced AutoCore’s PCU as the first heterogeneous hardware platform of the Autoware.IO project.
In this post we will show how to set up the arm-autonomy software stack to be used on the PCU.
This post is organized as follows:
arm-autonomy Yocto layer
The arm-autonomy layer is part of the meta-arm Yocto repository. As stated in the documentation, the arm-autonomy layer provides an hypervisor based solution (currently based on Xen) for autonomous system. It contains recipes and classes to build host and guest systems.
We will outline how to build the host and guest images, how to setup the micro SD card for the PCU and the way to boot the system and log into the domU.
Yocto Images build
The arm-autonomy documentation provides instructions on how to build the host and guest images. We will start with the guest image in order to get it automatically built in the host image in the next step.
Getting the sources
First we need to get the sources for our Yocto images, we can use the repo tool. To install it, please do:
$ mkdir ~/bin
$ curl http://commondatastorage.googleapis.com/git-repo-downloads/repo  > ~/bin/repo
$ chmod a+x ~/bin/repo
$ PATH=${PATH}:~/bin
Then we can get the repos as:
$ mkdir ~/arm_auto_pcu && cd ~/arm_auto_pcu
$ repo init -u https://git.linaro.org/people/servando.german.serrano/pcu_arm_auto.git/ -b dunfell
$ repo sync
We are now ready to start building the guest and host images.
Patching the sources
To get arm-autonomy to run on our PCU we need to introduce a couple of patches into the downloaded sources.
$ cd ~/arm_auto_pcu/sources/meta-virtualization/recipes-extended/xen/files
$ wget https://people.linaro.org/~servando.german.serrano/pcu/patches/0002-temp-hack-for-IRQ-Share.patch
And add the patch to ~/arm_auto_pcu/sources/meta-virtualization/recipes-extended/xen/xen_git.bb to SRC_URI:
SRC_URI = "git://xenbits.xen.org/xen.git;branch=${XEN_BRANCH} \
          file://0002-temp-hack-for-IRQ-Share.patch \
          "
Guest image
We will start creating the guest image so we can add it automatically to the host image at build time.
$ cd ~/arm_auto_pcu
$ source sources/poky/oe-init-build-env guest_prj
Now we need to modify the bblayers.conf and local.conf files.
We need to add the needed layers to the guest project bblayers.conf file, so it will look as shown below:
# POKY_BBLAYERS_CONF_VERSION is increased each time build/conf/bblayers.conf
# changes incompatibly
POKY_BBLAYERS_CONF_VERSION = "2"

BBPATH = "${TOPDIR}"
BBFILES ?= ""

BBLAYERS ?= " \
  /home/linaro/arm_autonomy/pcu_yocto/sources/poky/meta \
  /home/linaro/arm_autonomy/pcu_yocto/sources/poky/meta-poky \
  /home/linaro/arm_autonomy/pcu_yocto/sources/poky/meta-yocto-bsp \
  /home/linaro/arm_autonomy/pcu_yocto/sources/meta-openembedded/meta-oe \
  /home/linaro/arm_autonomy/pcu_yocto/sources/meta-openembedded/meta-python \
  /home/linaro/arm_autonomy/pcu_yocto/sources/meta-openembedded/meta-filesystems \
  /home/linaro/arm_autonomy/pcu_yocto/sources/meta-openembedded/meta-networking \
  /home/linaro/arm_autonomy/pcu_yocto/sources/meta-virtualization \
  /home/linaro/arm_autonomy/pcu_yocto/sources/meta-arm/meta-arm-autonomy \
  "
and we add the following to the local.conf file:
MACHINE ??= "arm64-autonomy-guest"
DISTRO_FEATURES += "arm-autonomy-guest"
BB_NUMBER_THREADS ?= "6"
PARALLEL_MAKE ?= "-j 6"

DISTRO ?= "poky"

PACKAGE_CLASSES ?= "package_rpm"
EXTRA_IMAGE_FEATURES ?= "debug-tweaks"
USER_CLASSES ?= "buildstats image-mklibs image-prelink"
PATCHRESOLVE = "noop"

BB_DISKMON_DIRS ??= "\
    STOPTASKS,${TMPDIR},1G,100K \
    STOPTASKS,${DL_DIR},1G,100K \
    STOPTASKS,${SSTATE_DIR},1G,100K \
    STOPTASKS,/tmp,100M,100K \
    ABORT,${TMPDIR},100M,1K \
    ABORT,${DL_DIR},100M,1K \
    ABORT,${SSTATE_DIR},100M,1K \
    ABORT,/tmp,10M,1K"
CONF_VERSION = "1"

IMAGE_INSTALL_append = " git bash sudo"
XENGUEST_IMAGE_AUTOBOOT = "0"
XENGUEST_IMAGE_NETWORK_BRIDGE = "0"

INITRAMFS_IMAGE_BUNDLE = "1"
INITRAMFS_IMAGE = "core-image-minimal"
IMAGE_FSTYPES += "cpio"
Following that we build a minimal guest image as:
$ bitbake core-image-minimal
Host image
Once we have the guest image built we can create the host project as follows:
$ cd ~/arm_auto_pcu
$ source sources/poky/oe-init-build-env host_prj
Now we need to modify the bblayers.conf and local.conf files. Your local.conf file will look as:
MACHINE ??= "ls1046afrwy"
DISTRO_FEATURES += "arm-autonomy-host"
BB_NUMBER_THREADS ?= "6"
PARALLEL_MAKE ?= "-j 6"

ARM_AUTONOMY_HOST_IMAGE_EXTERN_GUESTS = "/home/linaro/arm_autonomy/pcu_yocto/guest_prj/tmp/deploy/images/arm64-autonomy-guest/Image-initramfs-arm64-autonomy-guest.xenguest;guestname=myguest"
XENGUEST_MANAGER_VOLUME_DEVICE = "/dev/mmcblk0p4"
XEN_DEVICETREE_DOM0_MEM = "2048M"
XEN_DEVICETREE_DOM0_SIZE = "0x03000000"
XEN_DEVICETREE_DOM0_BOOTARGS = "console=hvc0 earlycon=xen root=/dev/mmcblk0p3 rw rootwait"

DISTRO ?= "poky"
PACKAGE_CLASSES ?= "package_rpm"
EXTRA_IMAGE_FEATURES ?= "debug-tweaks"
USER_CLASSES ?= "buildstats image-mklibs image-prelink"
PATCHRESOLVE = "noop"
BB_DISKMON_DIRS ??= "\
    STOPTASKS,${TMPDIR},1G,100K \
    STOPTASKS,${DL_DIR},1G,100K \
    STOPTASKS,${SSTATE_DIR},1G,100K \
    STOPTASKS,/tmp,100M,100K \
    ABORT,${TMPDIR},100M,1K \
    ABORT,${DL_DIR},100M,1K \
    ABORT,${SSTATE_DIR},100M,1K \
    ABORT,/tmp,10M,1K"
PACKAGECONFIG_append_pn-qemu-system-native = " sdl"
CONF_VERSION = "1"

DL_DIR = "/home/linaro/arm_autonomy/pcu_yocto/downloads"
SSTATE_DIR = "/home/linaro/arm_autonomy/pcu_yocto/sstate-cache"
INHERIT += "own-mirrors"
SOURCE_MIRROR_URL ?= "http://git.freescale.com/source/"
ACCEPT_FSL_EULA = "1"

IMAGE_INSTALL_append = " git bash sudo"
and we need to add the following layer to the bblayers.conf file:
# POKY_BBLAYERS_CONF_VERSION is increased each time build/conf/bblayers.conf
# changes incompatibly
POKY_BBLAYERS_CONF_VERSION = "2"

BBPATH = "${TOPDIR}"
BBFILES ?= ""

BBLAYERS ?= " \
  /home/linaro/arm_autonomy/pcu_yocto/sources/poky/meta \
  /home/linaro/arm_autonomy/pcu_yocto/sources/poky/meta-poky \
  /home/linaro/arm_autonomy/pcu_yocto/sources/poky/meta-yocto-bsp \
  /home/linaro/arm_autonomy/pcu_yocto/sources/meta-openembedded/meta-oe \
  /home/linaro/arm_autonomy/pcu_yocto/sources/meta-openembedded/meta-python \
  /home/linaro/arm_autonomy/pcu_yocto/sources/meta-openembedded/meta-filesystems \
  /home/linaro/arm_autonomy/pcu_yocto/sources/meta-openembedded/meta-networking \
  /home/linaro/arm_autonomy/pcu_yocto/sources/meta-virtualization \
  /home/linaro/arm_autonomy/pcu_yocto/sources/meta-arm/meta-arm-autonomy \
  /home/linaro/arm_autonomy/pcu_yocto/sources/meta-freescale \
  /home/linaro/arm_autonomy/pcu_yocto/sources/meta-freescale-distro \
  "
Following that we build the host image as:
$ bitbake arm-autonomy-host-image-minimal
SD card setup
We need to prepare the SD card for the PCU image. For our testing we have a 16GB card, the table bellow contains the set of partition sizes we have used, they are orientative and will depend on your particular use case.
| Partition | Size | Type |
|---|---|---|
| Free | 68MB | Unformatted |
| EFI | 24MB | FAT16 |
| boot | 1.1GB | Ext4 |
| rootfs | 4GB | Ext4 |
| guest | 9GB | Ext4 |
After the SD card is formatted we need to put the image together as follows.
$ cd ~/arm_auto_pcu/host_prj/tmp/deploy/images/ls1046afrwy
$ mkdir output
$ dd if=atf/bl2_sd.pbl of=output/firmware_ls1046afrwy_uboot_sdboot bs=512 seek=8
$ dd if=atf/fip_uboot.bin  of=output/firmware_ls1046afrwy_uboot_sdboot bs=512 seek=2048
$ dd if=fsl_fman_ucode_ls1046_r1.0_106_4_18.bin  of=output/firmware_ls1046afrwy_uboot_sdboot bs=512 seek=18432
$ dd if=boot/iram_Type_A_LS1021a_r1.0.bin  of=output/firmware_ls1046afrwy_uboot_sdboot bs=512 seek=18944
$ dd if=ls2-phy/cs4315-cs4340-PHY-ucode.txt  of=output/firmware_ls1046afrwy_uboot_sdboot bs=512 seek=19456
$ mkimage -T script -C none -d ./../../../../../sources/meta-qoriq-demos/recipes-bsp/secure-boot/secure-boot-qoriq/flash_images.sh flash_images.scr
$ dd if=flash_images.scr  of=output/firmware_ls1046afrwy_uboot_sdboot bs=512 seek=19968
$ dd if=fsl-ls1046a-frwy-sdk-xen.dtb of=output/firmware_ls1046afrwy_uboot_sdboot bs=512 seek=30720
$ tail -c +4097 output/firmware_ls1046afrwy_uboot_sdboot > output/firmware_ls1046afrwy_uboot_sdboot.img && rm output/firmware_ls1046afrwy_uboot_sdboot
$ sudo dd if=output/firmware_ls1046afrwy_uboot_sdboot.img of=/dev/sda bs=512 seek=8
$ echo 'load mmc 0:2 0x80080000 Image;load mmc 0:2 0x85000000 fsl-ls1046a-frwy-sdk-xen.dtb;load mmc 0:2 0x86000000 xen-ls1046afrwy;booti 0x86000000 - 0x85000000' >> output/ls1046afrwy_boot.scr.tmp
$ mkimage -A arm64 -O linux -T script -C none -a 0 -e 0  -n "boot.scr" -d output/ls1046afrwy_boot.scr.tmp output/ls1046afrwy_boot.scr
And we can now copy over to our SD card and extract within the rootfs partition:
$ sudo cp Image /media/linaro/boot
$ sudo cp fsl-ls1046a-frwy-sdk-xen.dtb /media/linaro/boot
$ sudo cp output/ls1046afrwy_boot.scr /media/linaro/boot
$ sudo cp xen-ls1046afrwy /media/linaro/boot
$ sudo cp arm-autonomy-host-image-minimal-ls1046afrwy.tar.gz /media/linaro/rootfs
$ cd /media/linaro/rootfs
$ sudo tar xzf arm-autonomy-host-image-minimal-ls1046afrwy.tar.gz
Booting the PCU
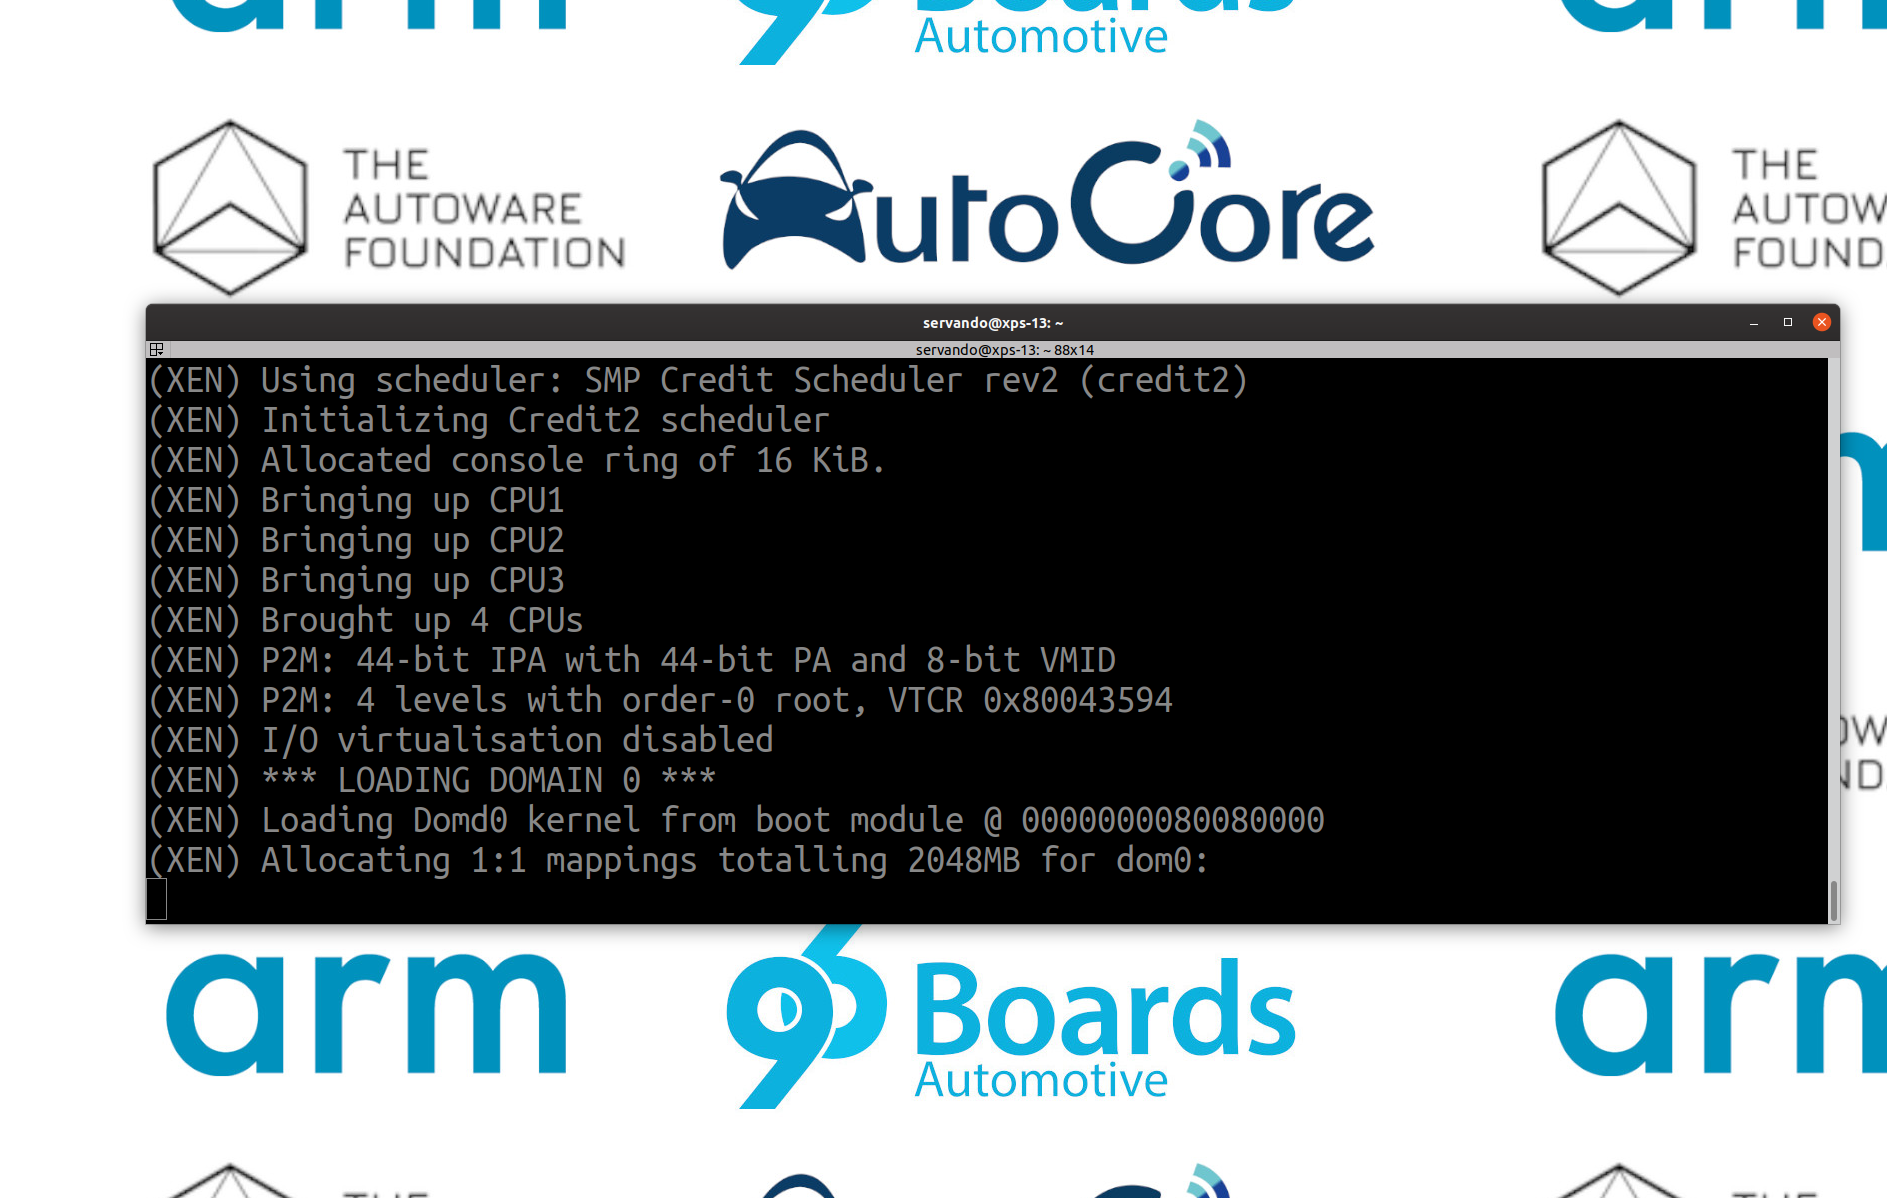
We are now ready to insert the micro SD card in its slot and turn on the PCU. We will see Xen booting first followed by the dom0 as shown in the images below.
Creating the domU and logging in
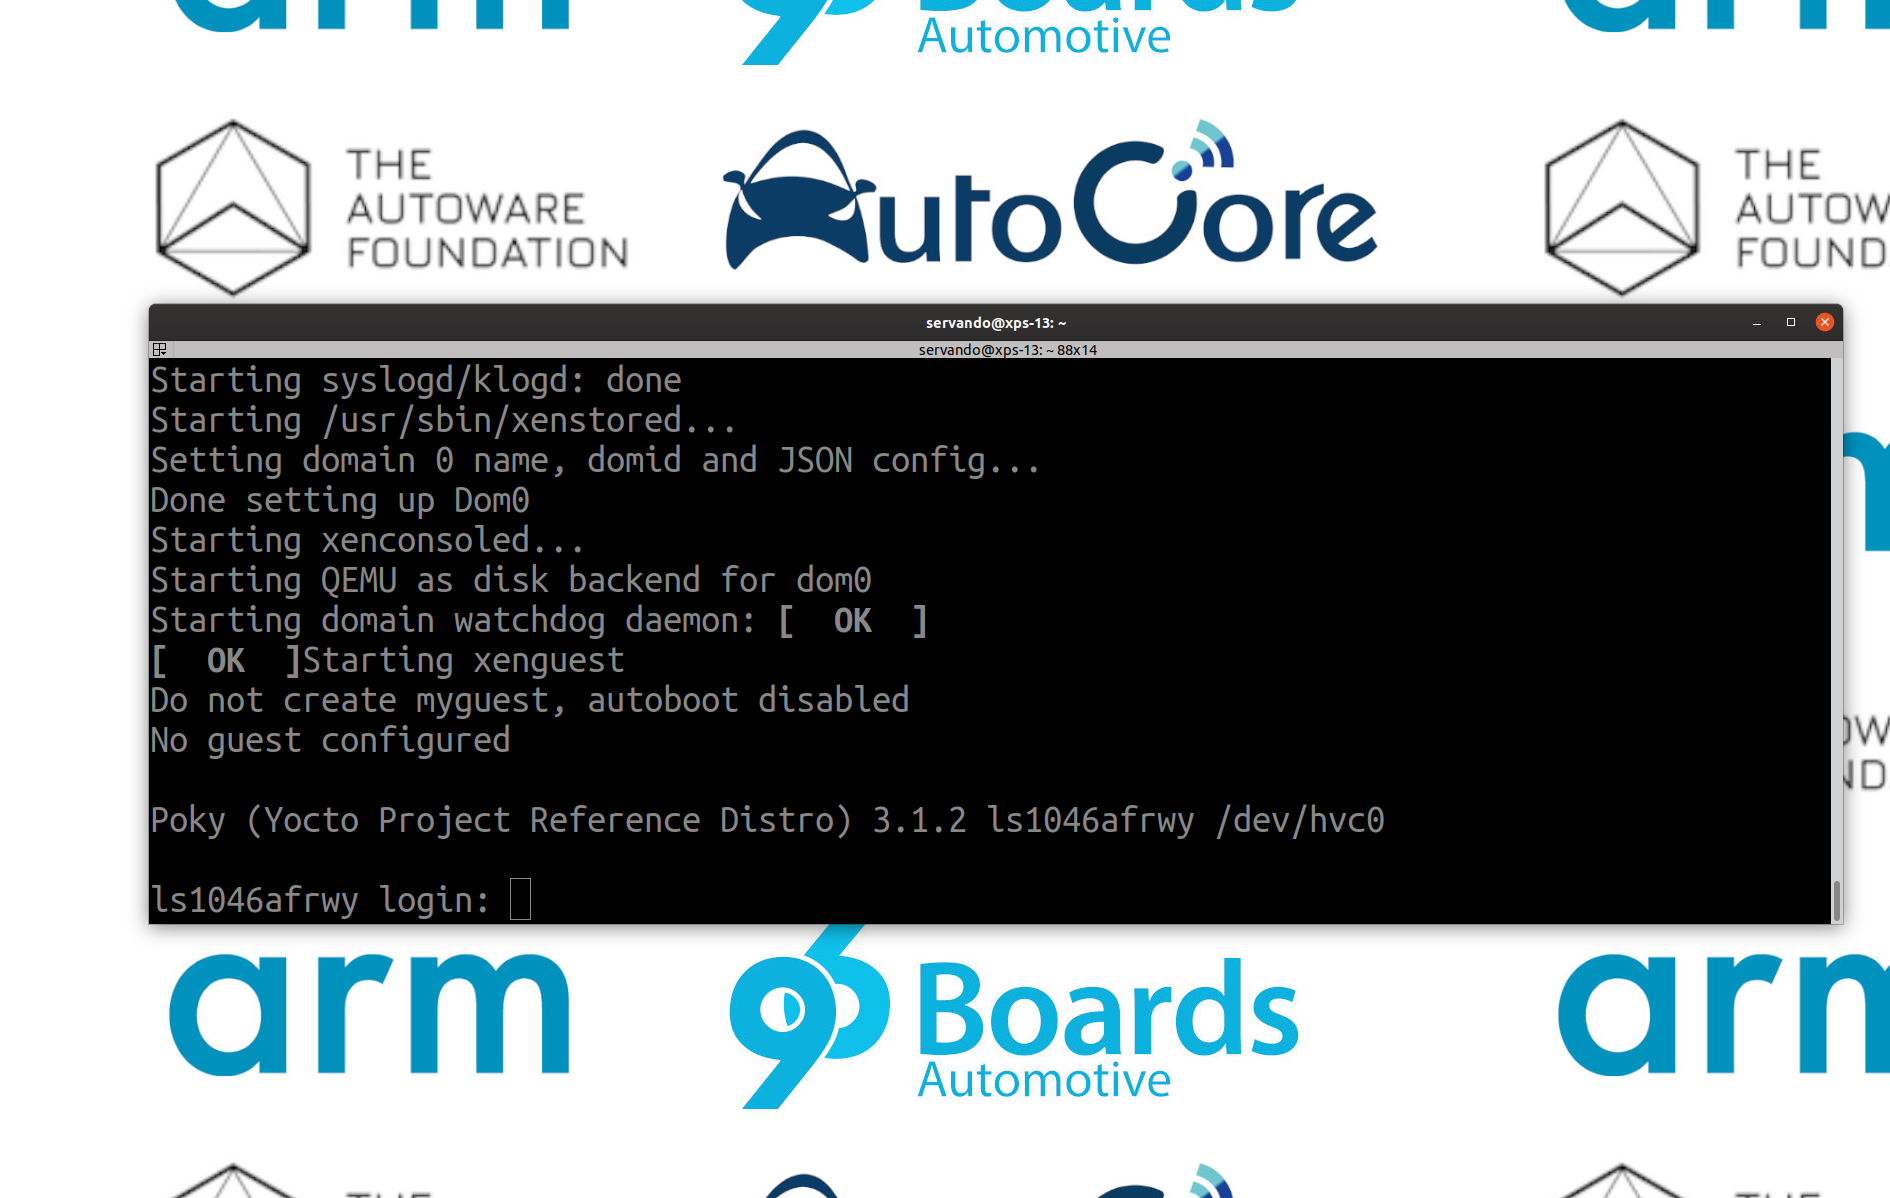
After logging into the dom0 we can create the guest image and log into the guest console as:
$ xenguest-manager create /usr/share/guests/myguest.xenguest myguest
$ xenguest-manager start myguest
$ xl console myguest
We can log into the guest VM using the root username as shown in the image below.

Video demo
We have posted a video demo of the steps to get the arm-autonomy software stack running on the PCU below.
Conclusion
In this first look at the arm-autonomy layer we have shown how to build the stack for AutoCore’s PCU and the way to start the Xen hypervisor, dom0 and domU within the board.
We are now ready to build on top of this and we will look at deploying ROS2 into the guest VM in the next blog, this way we will have all the components that we need to integrate Autoware.Auto to run in a guest VM handled by the Xen hypervisor, so keep an eye to this space.
This article is Part 9 in a 15-Part Series.
- Part 1 - 96boards: Autoware everywhere | Autoware.AI and Hikey970
- Part 2 - 96boards: Autoware everywhere | Autoware.Auto and Hikey970
- Part 3 - 96boards: Autoware everywhere | Bridging .AI and .Auto in the Hikey970
- Part 4 - 96boards: Autoware everywhere | Autoware.AI and Dragonboard-845c
- Part 5 - 96boards: Autoware everywhere | Autoware.Auto, bridge with .AI and Dragonboard-845c
- Part 6 - 96boards: Autoware everywhere | Binding Autoware.AI nodes to CPUs
- Part 7 - 96boards: Autoware everywhere | Defaulting to Cyclone DDS
- Part 8 - 96boards: Autoware everywhere | First look at AutoCore's PCU
- Part 9 - 96boards: Autoware everywhere | meta-arm-autonomy in AutoCore's PCU
- Part 10 - 96boards: Autoware everywhere | Running Cyclone DDS on Kubernetes
- Part 11 - 96boards: Autoware everywhere | Xenomai on PCU
- Part 12 - 96boards: Autoware everywhere | K8s-based Autoware deployment on PCU
- Part 13 - 96boards: Autoware everywhere | Autoware.Auto 3D Perception Stack using k8s on PCU
- Part 14 - 96boards: Autoware everywhere | Multi-board Autoware.Auto 3D Perception Stack using k8s
- Part 15 - 96boards: Autoware everywhere | Updating Autoware.Auto 3D Perception Stack modules


