
Introduction
In our previous blog post we showed how to setup a Kubernetes (k8s) cluster using a laptop as the master node and Autocore’s PCU as the worker node to deploy the different k8s pods. To test the setup we run a minimal deployment using the ddsperf tool that is available as part of Cyclone DDS.
In this first exploration we are going to create 2 k8s single-pod deployments on the PCU:
- One that will read a rosbag data file. This data file has been recorded by TierIV using the new architecture implementation.
- The other will echo the
/sensing/imu/imu_datatopic that is being published by the other pod.
In addition we are going to kick off Rviz2 and the rqt-image-view packages from ROS2 in the laptop to visualize the data. For this demo we are setting the pods to use the hostNetwork as both k8s nodes are in the same local network.
This post is organized as follows:
New Autoware Architecture Proposal
To improve the development of Autoware capabilities TierIV has developed a new Architecture. This architecture provides a layered approach to the different software stack components and definition of the interfaces between modules. We will use the ros2 v0.5.0 tag of the Pilot.Auto software stack which is built using the new architecture as reference.
PCU setup
The first thing we need to do is install k8s in the PCU and laptop. To do so we have first flashed the PCU with Autocore’s provided image as we explained in this post. We have used the latest release from AutoCore which, at the time of writing, is 20201214 Release Package.
After getting the PCU SD card ready we can boot the board, ssh into it and install k8s as we did before here.
Note We need to enable iptable forwarding rules on the PCU for the pods to communicate with each other, we can do so as:
$ iptables -P FORWARD ACCEPT
Running the k8s pods
We are now ready to get things running on k8s, for the fully detailed steps please check our previous blog. As a recap, we need to:
- Kick off the master node in the laptop.
- Join the PCU as a worker node.
- Enable the Flannel CNI add-on and copy the Flannel environment variables to the PCU.
We can check that the worker node on the PCU has joined the cluster by running kubectl get nodes on the laptop as shown below. 
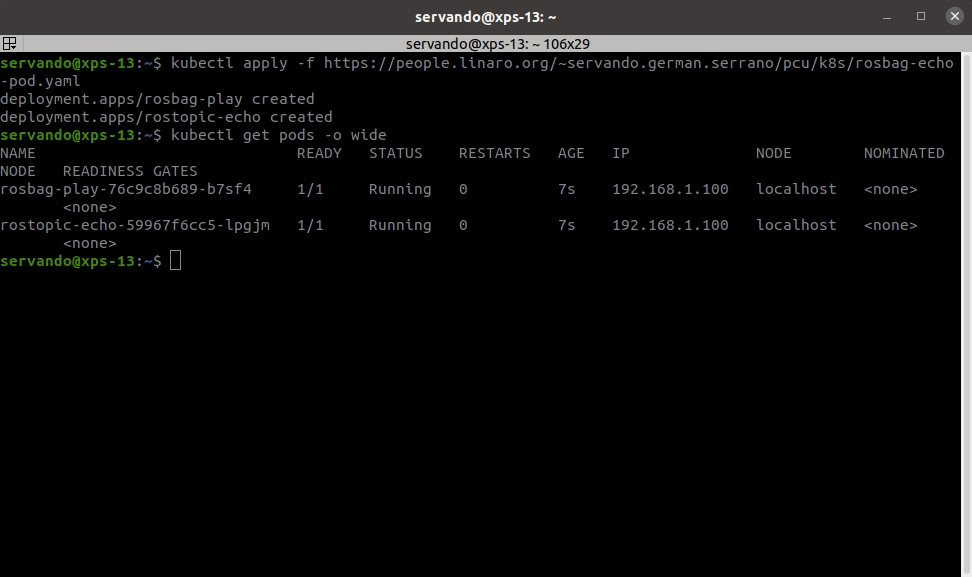
Now to deploy the pods on the PCU node we are going to use the rosbag-echo-pod.yaml k8s deployment file available here. This file starts the 2 deployments we have mentioned earlier, a rosbag replay deployment and another to echo the IMU data. We can start both deployments as:
$ kubectl apply -f https://people.linaro.org/~servando.german.serrano/pcu/k8s/rosbag-echo-pod.yaml
We can see that both pods are now running and they have been deployed on the PCU node (named localhost). To check that the rostopic pod is receiving data we can get the logs from the pod as:
$ kubectl logs --follow rostopic-echo-59967f6cc5-lpgjm
Now, we can use the laptop to visualize some of the LIDAR data that it’s being replayed in Rviz2. 
Conclusion
In this post we have shown how to deploy a couple of k8s pods on the PCU. We can take this initial setup as reference to explore further splitting the different Autoware modules into individual pods that can be managed using k8s.
This article is Part 12 in a 15-Part Series.
- Part 1 - 96boards: Autoware everywhere | Autoware.AI and Hikey970
- Part 2 - 96boards: Autoware everywhere | Autoware.Auto and Hikey970
- Part 3 - 96boards: Autoware everywhere | Bridging .AI and .Auto in the Hikey970
- Part 4 - 96boards: Autoware everywhere | Autoware.AI and Dragonboard-845c
- Part 5 - 96boards: Autoware everywhere | Autoware.Auto, bridge with .AI and Dragonboard-845c
- Part 6 - 96boards: Autoware everywhere | Binding Autoware.AI nodes to CPUs
- Part 7 - 96boards: Autoware everywhere | Defaulting to Cyclone DDS
- Part 8 - 96boards: Autoware everywhere | First look at AutoCore's PCU
- Part 9 - 96boards: Autoware everywhere | meta-arm-autonomy in AutoCore's PCU
- Part 10 - 96boards: Autoware everywhere | Running Cyclone DDS on Kubernetes
- Part 11 - 96boards: Autoware everywhere | Xenomai on PCU
- Part 12 - 96boards: Autoware everywhere | K8s-based Autoware deployment on PCU
- Part 13 - 96boards: Autoware everywhere | Autoware.Auto 3D Perception Stack using k8s on PCU
- Part 14 - 96boards: Autoware everywhere | Multi-board Autoware.Auto 3D Perception Stack using k8s
- Part 15 - 96boards: Autoware everywhere | Updating Autoware.Auto 3D Perception Stack modules


