
Introduction
In this blog post we will look at how we can bind certain Autoware.AI nodes to specific cores in our hardware. This is of special interest when we use different type of CPUs on the same board, as happens with the Hikey970 and the Qualcomm® Robotics (RB3) Dragonboard-845c Development Platform. We will focus on the ndt_matching node from Autoware.AI on the RB3 board.
It is worth mentioning that the presented method is not specific to Autoware alone and has been extracted from this question in ROS answers.
The post is organized as follows:
Requirements
The main requirements for the steps on this blogs are:
- Have a board where different CPU cores live together.
- Have your board running with Docker installed.
- Be familiar with the work that we conducted previously within the “Autoware everywhere” series on Autoware.AI for the Hikey970 or the RB3.
For the remaining of the blog it is assumed that you are able to successfully run the rosbag demo on your board as outlined in previous posts.
Identifying CPUs
Before attempting to bind certain nodes to specific CPUs we need to identify which one would be most appropriate for a particular task.
To do so we can add the -e flag to lscpu which will provide what information is available about the CPUs.
If we do so on the RB3 we get:
$ lscpu -e
CPU NODE SOCKET CORE L1d:L1i:L2:L3 ONLINE MAXMHZ    MINMHZ
0   0    0      0    0:0:0:0       yes    1766.4000 300.0000
1   0    0      1    1:1:1:0       yes    1766.4000 300.0000
2   0    0      2    2:2:2:0       yes    1766.4000 300.0000
3   0    0      3    3:3:3:0       yes    1766.4000 300.0000
4   0    1      4    4:4:4:0       yes    2649.6001 825.6000
5   0    1      5    5:5:5:0       yes    2649.6001 825.6000
6   0    1      6    6:6:6:0       yes    2649.6001 825.6000
7   0    1      7    7:7:7:0       yes    2649.6001 825.6000
which shows that the most capable CPUs are identified by numbers 4 to 7. These are the ones we will bind Autoware.AI’s ndt_matching nodes in the next section.
Binding nodes to CPUs
We can bind sets of nodes to specific CPUs using taskset and adding the launch-prefix parameter to the launch file responsible for starting the nodes. So we need to add:
launch-prefix = "taskset -c CPUs"
where CPUs is the list of CPUs we want the node to run on, e.g. 1, 2-4, etc.
Please note that setting a set of nodes to run on specific cores will not avoid other tasks to also run on those cores.
Modifying my_localization.launch
In our example, since the ndt_matching algorithm is computationally expensive, we would like to bound the localization nodes to the more powerful cores on our board. The my_localization.launch file looks like:
<launch>

  <!-- setting path parameter -->
  <arg name="get_height" value="true" />

  <!-- Setup -->
  <include file="$(find runtime_manager)/launch_files/setup_tf.launch">
    <arg name="x" value="1.2" />
    <arg name="y" value="0.0" />
    <arg name="z" value="2.0" />
    <arg name="yaw" value="0.0" />
    <arg name="pitch" value="0.0" />
    <arg name="roll" value="0.0" />
    <arg name="frame_id" value="/base_link" />
    <arg name="child_frame_id" value="/velodyne" />
    <arg name="period_in_ms" value="10"/>
  </include>
  <include file="$(find vehicle_description)/launch/vehicle_model.launch" />

  <!-- points downsampler -->
  <include file="$(find points_downsampler)/launch/points_downsample.launch" />

  <!-- nmea2tfpose -->
  <include file="$(find gnss_localizer)/launch/nmea2tfpose.launch"/>

  <!-- ndt_matching -->
  <include file="$(find lidar_localizer)/launch/ndt_matching.launch">
    <arg name="get_height" value="$(arg get_height)" />
  </include>

</launch>
We can see that the ndt_matching node is located inside the lidar_localizer package. The ndt_matching.launch file looks like:
<!-- -->
<launch>

  <arg name="method_type" default="0" /> <!-- pcl_generic=0, pcl_anh=1, pcl_anh_gpu=2, pcl_openmp=3 -->
  <arg name="use_gnss" default="1" />
  <arg name="use_odom" default="false" />
  <arg name="use_imu" default="false" />
  <arg name="imu_upside_down" default="false" />
  <arg name="imu_topic" default="/imu_raw" />
  <arg name="queue_size" default="1" />
  <arg name="offset" default="linear" />
  <arg name="get_height" default="false" />
  <arg name="use_local_transform" default="false" />
  <arg name="sync" default="false" />
  <arg name="output_log_data" default="false" />
  <arg name="gnss_reinit_fitness" default="500.0" />

  <node pkg="lidar_localizer" type="ndt_matching" name="ndt_matching" output="log">
    <param name="method_type" value="$(arg method_type)" />
    <param name="use_gnss" value="$(arg use_gnss)" />
    <param name="use_odom" value="$(arg use_odom)" />
    <param name="use_imu" value="$(arg use_imu)" />
    <param name="imu_upside_down" value="$(arg imu_upside_down)" />
    <param name="imu_topic" value="$(arg imu_topic)" />
    <param name="queue_size" value="$(arg queue_size)" />
    <param name="offset" value="$(arg offset)" />
    <param name="get_height" value="$(arg get_height)" />
    <param name="use_local_transform" value="$(arg use_local_transform)" />
    <param name="output_log_data" value="$(arg output_log_data)" />
    <param name="gnss_reinit_fitness" value="$(arg gnss_reinit_fitness)" />
    <remap from="/points_raw" to="/sync_drivers/points_raw" if="$(arg sync)" />
  </node>

</launch>
This launch file takes some parameters and starts the ndt_matching node. If you went through our Autoware.AI in RB3 blog you might recall that this is the file we had to change to select the OpenMP implementation of the ndt_matching node to successfully localize with the RB3.
For a quick test we can directly modify the installed launch file by doing:
$ sed -i 's\<node pkg="lidar_localizer"\<node launch-prefix="taskset -c 4-7" pkg="lidar_localizer"\g' ~/Autoware/install/lidar_localizer/share/lidar_localizer/launch/ndt_matching.launch
We have chosen CPU IDs 4 to 7 since we have seen above that those are the ones with higher capacity.
RB3 Results
This time we will use 3 terminals:
- Terminal 1: to load all nodes.
$ roscore &
$ rosparam load ~/shared_dir/headless_setup.yaml &
$ roslaunch autoware_quickstart_examples my_map.launch &
$ roslaunch autoware_quickstart_examples my_sensing.launch &
$ roslaunch autoware_quickstart_examples my_localization.launch &
$ roslaunch lidar_localizer ndt_matching_monitor.launch &
$ rostopic echo /ndt_monitor/ndt_status
- Terminal 2: to control the rosbag replay.
$ rosbag play --pause ~/shared_dir/sample_moriyama_150324.bag --clock
- Terminal 3: to visualize core load with
htop.
$ htop
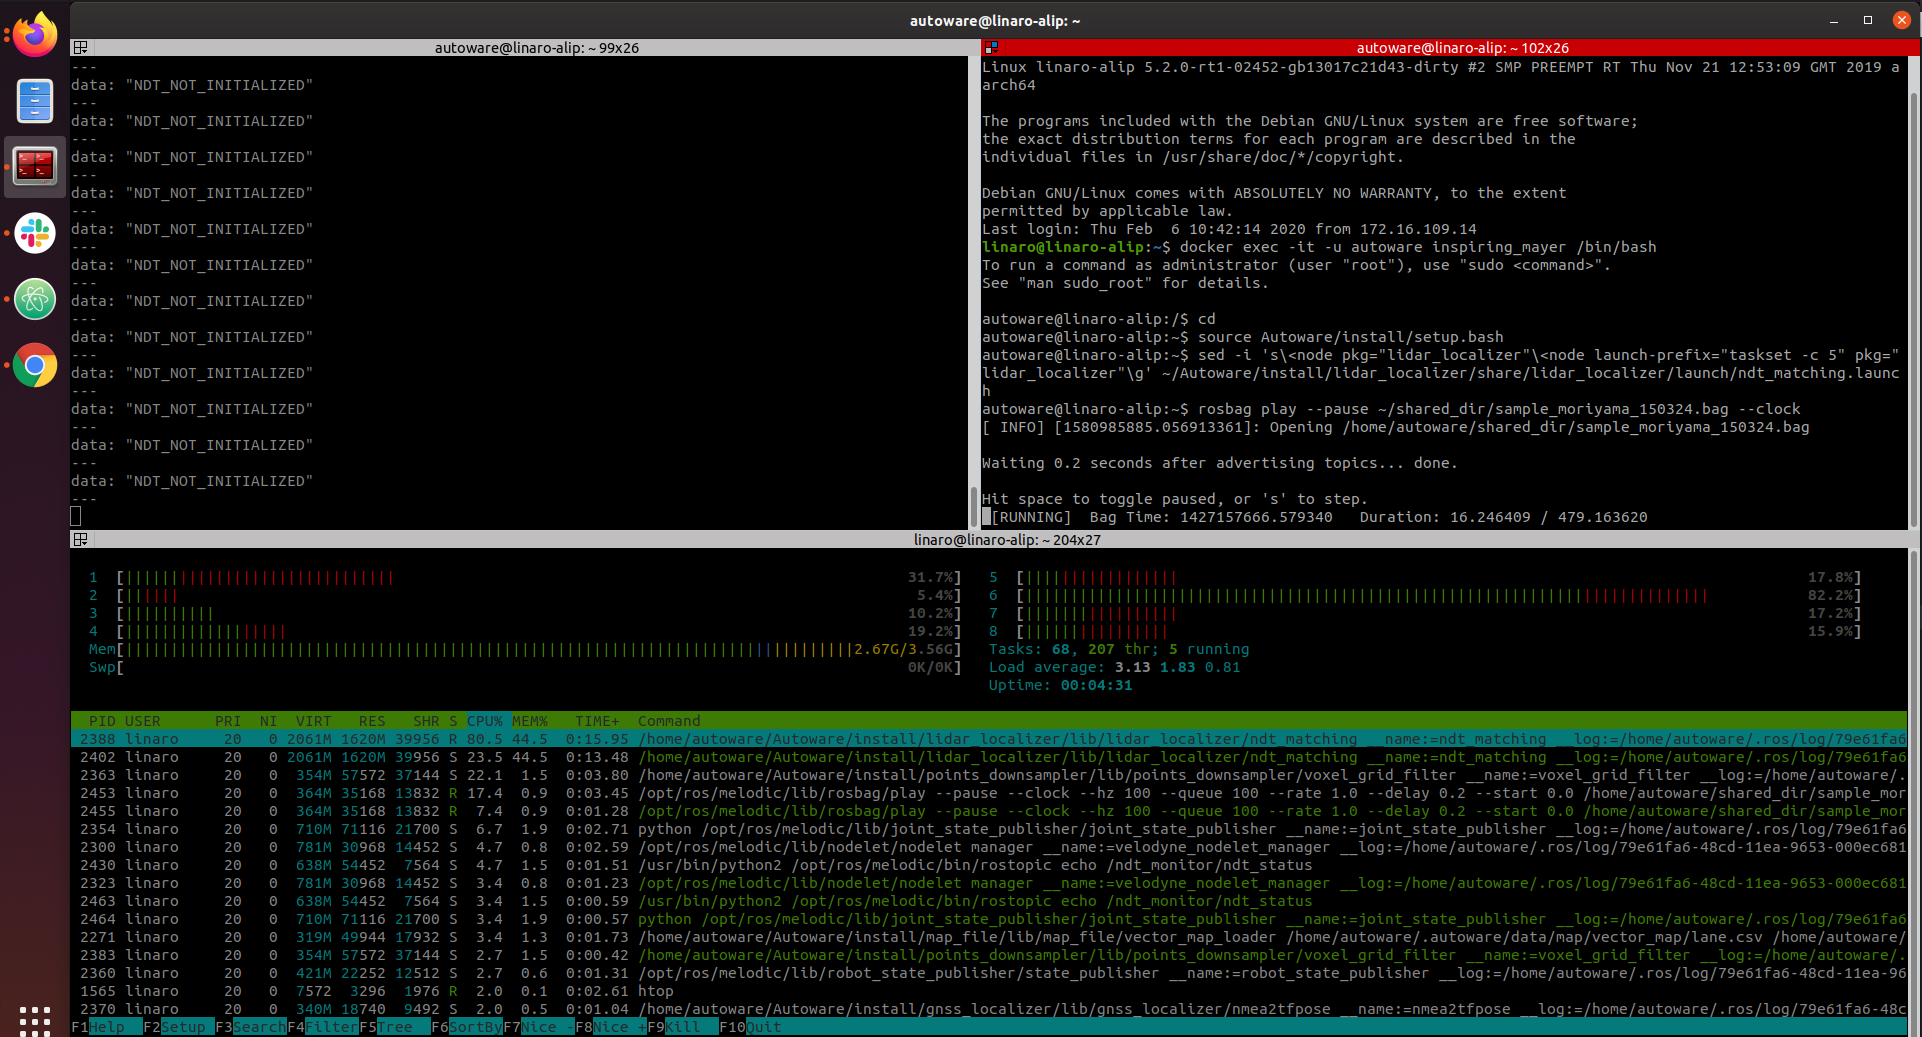
First we are going to check whether adding the taskset prefix makes a difference to the CPU load. So, instead of selecting CPU IDs 4 to 7 we are setting just the CPU with ID 5. The image below shows that the CPU with number 6 in htop, which is the one ID 5 belongs to is more loaded than the rest when executing the demo.
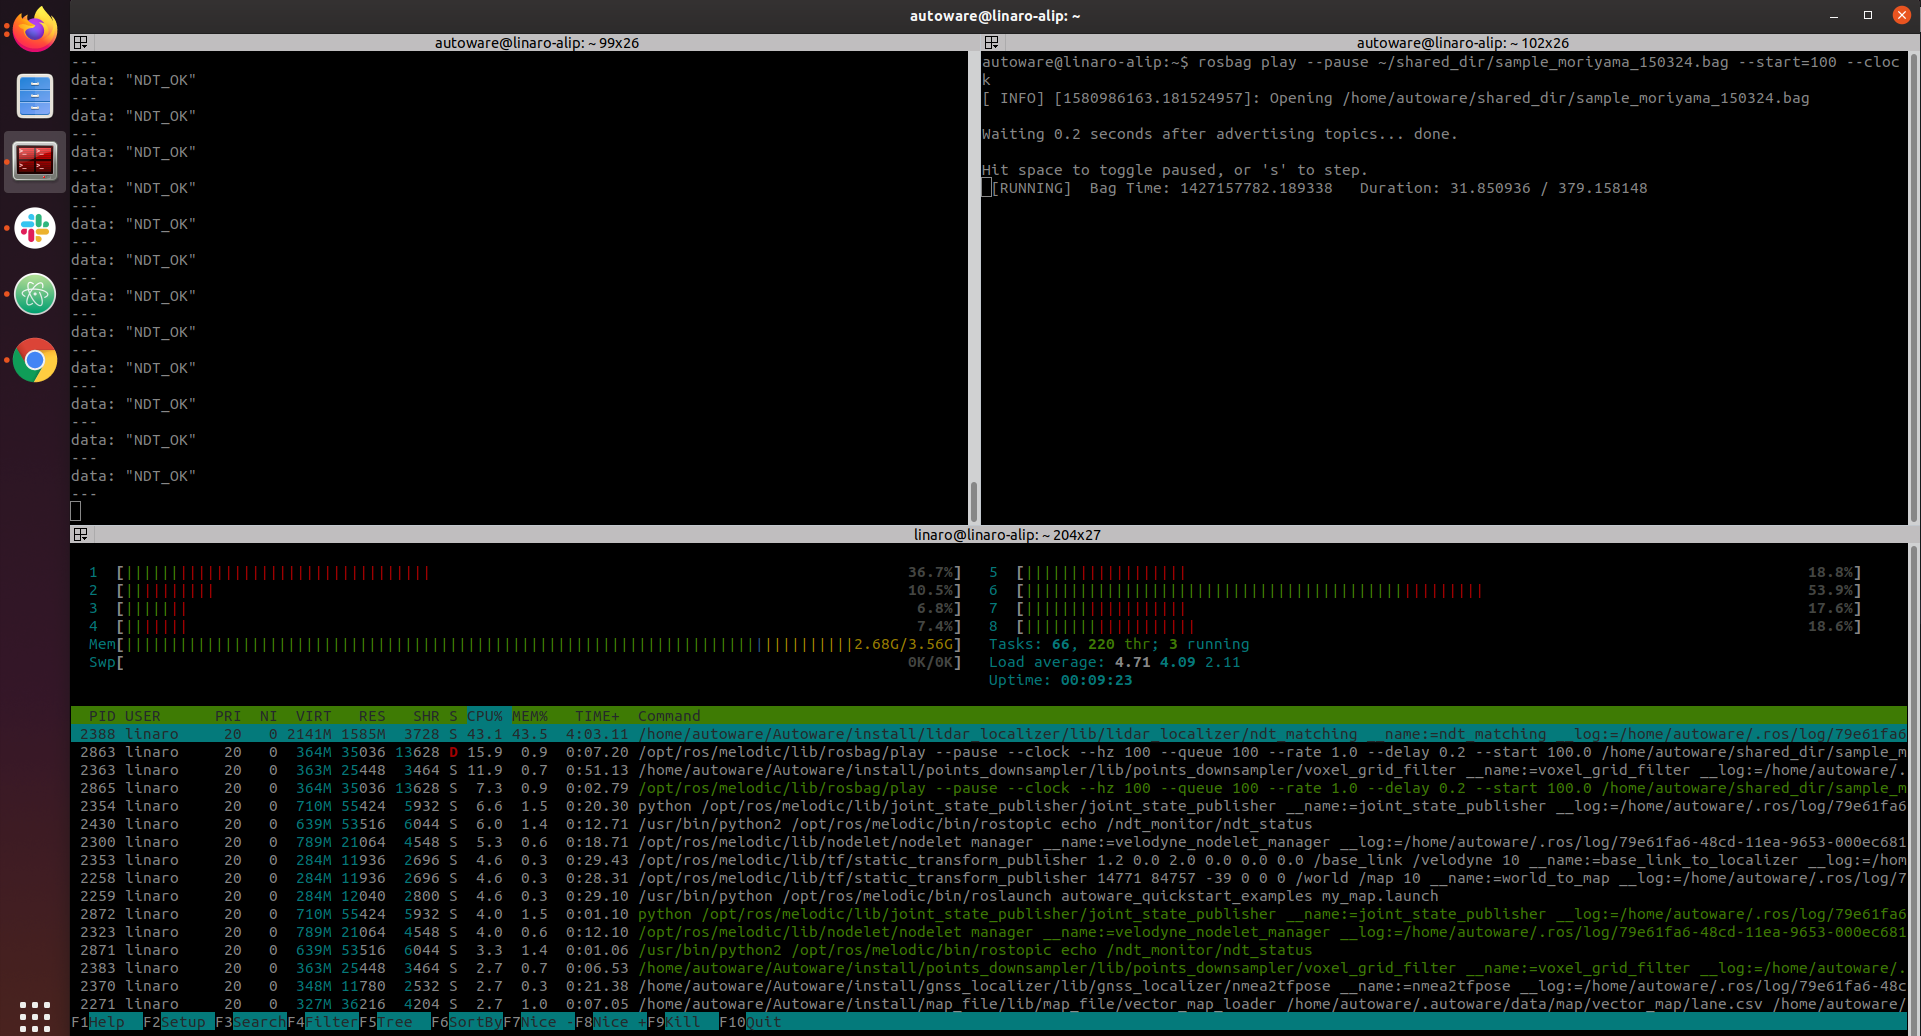
For normal execution we have assigned the ndt_matching to run on CPUs with ID 4 to 7, without using the OpenMP implementation. We can see below that with this configuration the ndt_matching algorithm has managed to output the correct localization as per ndt_status topic.
Conclusion
In this post we have shown how we can assign different nodes to run on specific CPUs in the board. This opens the possibility to start looking into splitting Autoware loads when looking at distributing the different nodes on different boards.
This article is Part 6 in a 15-Part Series.
- Part 1 - 96boards: Autoware everywhere | Autoware.AI and Hikey970
- Part 2 - 96boards: Autoware everywhere | Autoware.Auto and Hikey970
- Part 3 - 96boards: Autoware everywhere | Bridging .AI and .Auto in the Hikey970
- Part 4 - 96boards: Autoware everywhere | Autoware.AI and Dragonboard-845c
- Part 5 - 96boards: Autoware everywhere | Autoware.Auto, bridge with .AI and Dragonboard-845c
- Part 6 - 96boards: Autoware everywhere | Binding Autoware.AI nodes to CPUs
- Part 7 - 96boards: Autoware everywhere | Defaulting to Cyclone DDS
- Part 8 - 96boards: Autoware everywhere | First look at AutoCore's PCU
- Part 9 - 96boards: Autoware everywhere | meta-arm-autonomy in AutoCore's PCU
- Part 10 - 96boards: Autoware everywhere | Running Cyclone DDS on Kubernetes
- Part 11 - 96boards: Autoware everywhere | Xenomai on PCU
- Part 12 - 96boards: Autoware everywhere | K8s-based Autoware deployment on PCU
- Part 13 - 96boards: Autoware everywhere | Autoware.Auto 3D Perception Stack using k8s on PCU
- Part 14 - 96boards: Autoware everywhere | Multi-board Autoware.Auto 3D Perception Stack using k8s
- Part 15 - 96boards: Autoware everywhere | Updating Autoware.Auto 3D Perception Stack modules


