
Introduction
In our previous blog we showed how to run a subset of Autoware.AI’s components on the Hikey970.
For this instance we will look at getting Autoware.Auto working in the same Hikey970 and running the Autoware.Auto 3D Perception Stack demo.
The post is organized as follows:
Requirements
For the following steps you will need your Hikey970 to be accesible via SSH and, for an easier setup, have Docker installed on it. So, to get the board ready you can follow the steps here if you plan to also develop real time applications using ROS/ROS2.
In addition, to install Docker you just need to follow the official steps to install docker on arm64 target for Ubuntu.
Please note that to successfully run Autoware.Auto you will need to have ROS Melodic in addition to ROS2 Dashing (at the time of writing). This setup is needed to make use of the ros1_bridge to be able to integrate Autoware.Auto and Autoware.AI.
- For a full native installation you can follow the official steps to install ROS Melodic and to install ROS Dashing.
- For convenience we have created a docker image with a default root
linarouser that integrates both, to get it please do:$ docker pull 96boards/ros:mel_dash
For visualization purposes you also need a laptop with ROS2 installed natively or through a docker image.
Getting Autoware.Auto
From source
To get the source code for Autoware.Auto you just need to:
$ git clone --recursive https://gitlab.com/autowarefoundation/autoware.auto/AutowareAuto.git ~/AutowareAuto
To build it please do:
$ docker run -it --rm --privileged --net=host -u linaro -v ~/AutowareAuto:/home/linaro/AutowareAuto:rw 96boards/ros:mel_dash /bin/bash
$ cd AutowareAuto
$ colcon build
Note It is possible that your Autoware.Auto clone has newer dependencies than the ones available in the 96boards/ros:mel_dash docker image which will cause the build to fail, in that case please do:
$ cd AutowareAuto
$ rosdep update
$ rosdep install -y --from-paths src --ignore-src
$ colcon build
Docker
For evaluation purposes an Autoware.Auto docker image with a default root linaro user is available at the 96boards/autoware Dockerhub repo. Please note that this image is likely not to be updated regularly and some of the latest Autoware.Auto functionalities might not be available. To make use of the latest capabilities please follow the above instructions. To get the image please do:
$ docker pull 96boards/autoware:auto
Running the 3D Perception Stack demo
To run the Autoware.Auto 3D Perception Stack demo we will roughly follow the steps here but adapted to our setup.
In the laptop we get the config files and open 2 terminals to run 2 instances of rviz2 as:
$ wget https://gitlab.com/autowarefoundation/autoware.auto/AutowareAuto/raw/master/src/tools/autoware_auto_examples/rviz2/autoware.rviz
$ wget https://gitlab.com/autowarefoundation/autoware.auto/AutowareAuto/raw/master/src/tools/autoware_auto_examples/rviz2/autoware_voxel.rviz
- Terminal 1:
$ rviz2 -d autoware.rviz - Terminal 2:
$ rviz2 -d autoware_voxel.rviz
Now we need to ssh into the Hikey970 in 4 terminals and then we need to do the following:
- First, to get the demo data you can download it manually to the laptop and then
scpthe file to the board or try the following in the Hikey970 (if you followed our previous post you will already have ashared_dir, otherwise pleasemkdir shared_dirbefore doing the steps below). So, in Terminal 1:$ cd shared_dir $ wget http://people.linaro.org/~servando.german.serrano/autoware/autoware.auto_get_demo_data $ chmod +x autoware.auto_get_demo_data $ ./autoware.auto_get_demo_dataIf the download link has not changed the script will download the file. Depending on the internet connection it will take some time to complete (the file is around 900Mb).
- In Terminal 1, depending on the option you chose above:
- For the docker option above please do:
$ docker run -it --rm --privileged --net=host -u linaro -v ~/shared_dir:/home/linaro/shared_dir:rw 96boards/autoware:auto /bin/bash $ cd ~ $ source AutowareAuto/install/setup.bash - For the source option:
$ docker run -it --rm --privileged --net=host -u linaro -v ~/shared_dir:/home/linaro/shared_dir:rw -v ~/AutowareAuto:/home/linaro/AutowareAuto:rw 96boards/ros:mel_dash /bin/bash
$ cd ~
$ source AutowareAuto/install/setup.bash
- For the docker option above please do:
- In terminals 2 to 4 we need to access the running container as we did here but using the
linarouser:$ docker exec -it -u linaro CONTAINER_NAME /bin/bash $ cd ~ $ source AutowareAuto/install/setup.bash - Terminal 1:
$ udpreplay ~/shared_dir/route_small_loop_rw-127.0.0.1.pcap - Terminal 2:
$ ros2 run velodyne_node velodyne_cloud_node_exe __params:=/home/"${USER}"/AutowareAuto/src/drivers/velodyne_node/param/vlp16_test.param.yaml - Terminal 3:
$ ros2 run ray_ground_classifier_nodes ray_ground_classifier_cloud_node_exe __params:=/home/"${USER}"/AutowareAuto/src/perception/filters/ray_ground_classifier_nodes/param/vlp16_lexus.param.yaml - Terminal 4:
$ ros2 run voxel_grid_nodes voxel_grid_cloud_node_exe __params:=/home/"${USER}"/AutowareAuto/src/perception/filters/voxel_grid_nodes/param/vlp16_lexus_centroid.param.yaml
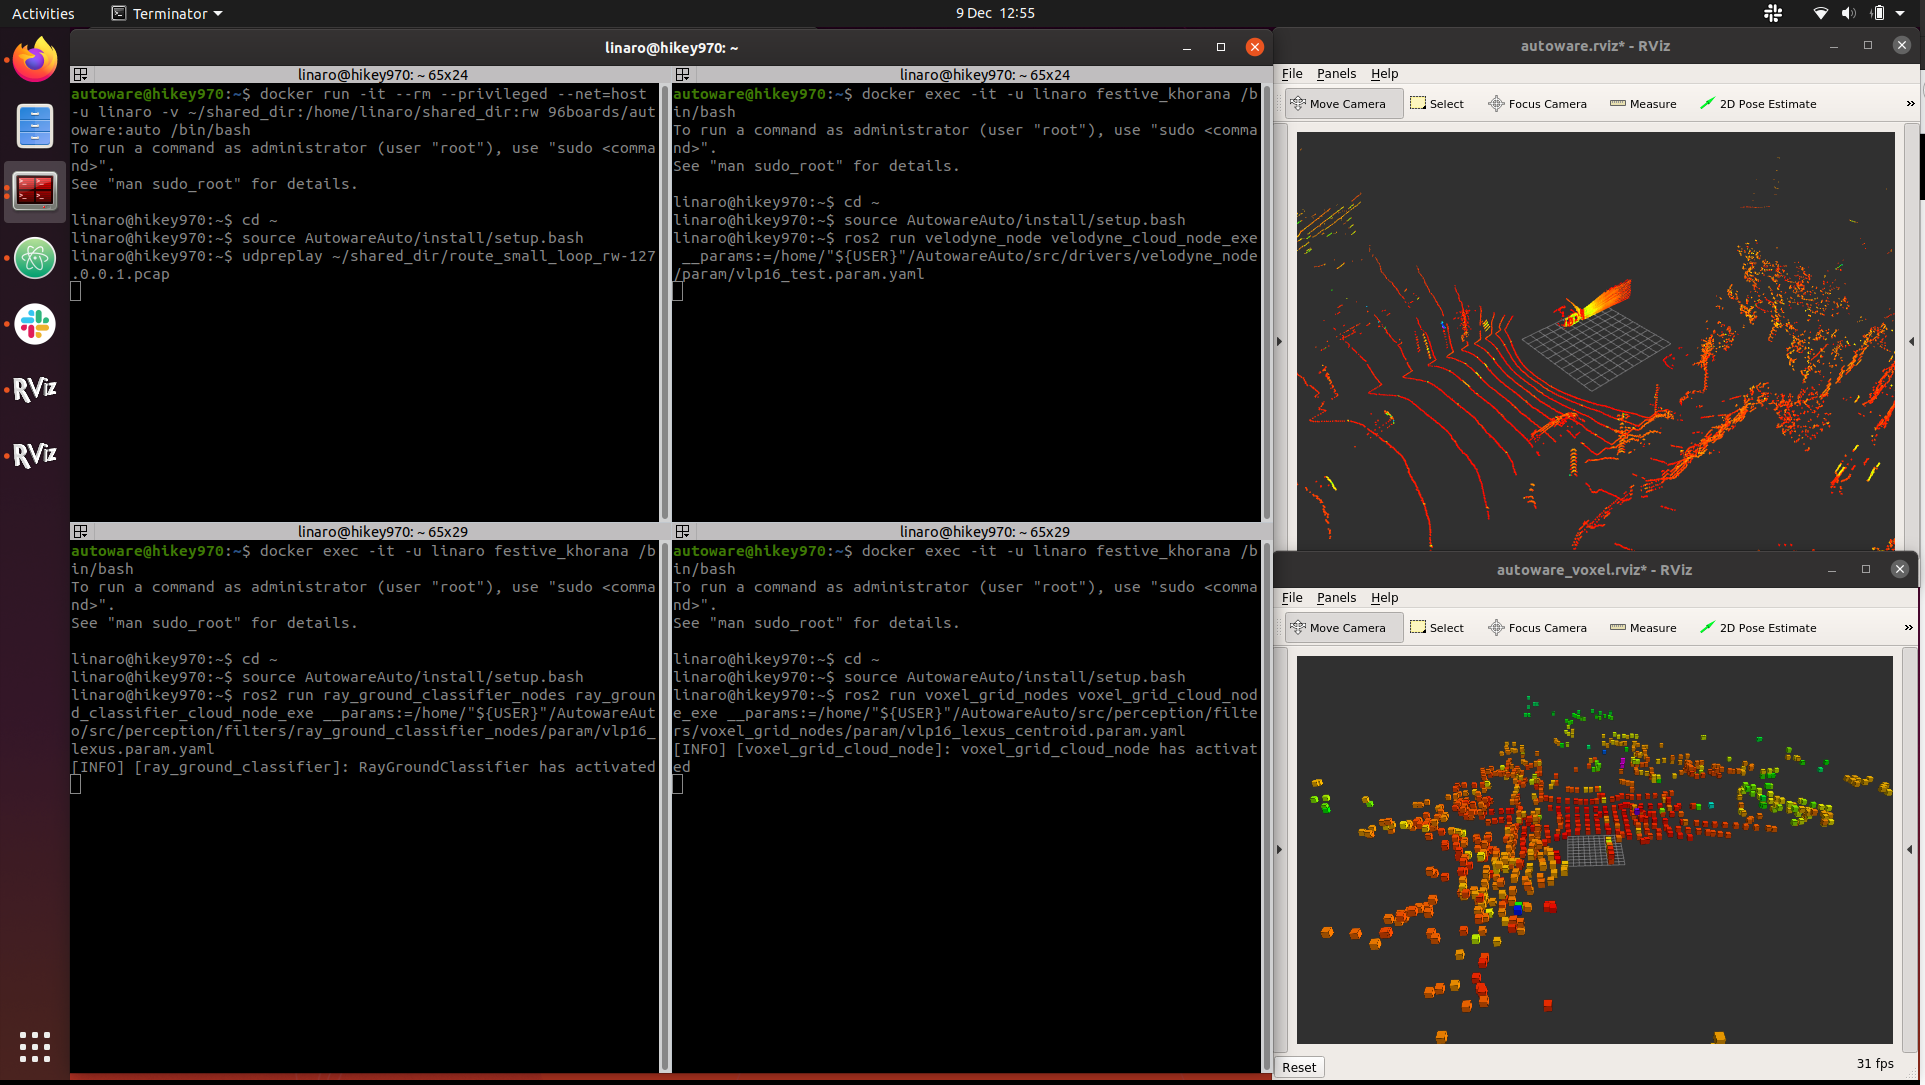
If everything went fine we will be able to visualize the demo point cloud and downsampled one in the running rviz2 GUIs as can be seen in the image below.
Conclusion
In this blog post we have added Autoware.Auto to our board and run the 3D Perception Stack demo. With this we now have Autoware.AI and Autoware.Auto in the same hardware so in the next post we will see how to link the 2 stacks together through the ros1_bridge, so keep an eye to this space.
This article is Part 2 in a 15-Part Series.
- Part 1 - 96boards: Autoware everywhere | Autoware.AI and Hikey970
- Part 2 - 96boards: Autoware everywhere | Autoware.Auto and Hikey970
- Part 3 - 96boards: Autoware everywhere | Bridging .AI and .Auto in the Hikey970
- Part 4 - 96boards: Autoware everywhere | Autoware.AI and Dragonboard-845c
- Part 5 - 96boards: Autoware everywhere | Autoware.Auto, bridge with .AI and Dragonboard-845c
- Part 6 - 96boards: Autoware everywhere | Binding Autoware.AI nodes to CPUs
- Part 7 - 96boards: Autoware everywhere | Defaulting to Cyclone DDS
- Part 8 - 96boards: Autoware everywhere | First look at AutoCore's PCU
- Part 9 - 96boards: Autoware everywhere | meta-arm-autonomy in AutoCore's PCU
- Part 10 - 96boards: Autoware everywhere | Running Cyclone DDS on Kubernetes
- Part 11 - 96boards: Autoware everywhere | Xenomai on PCU
- Part 12 - 96boards: Autoware everywhere | K8s-based Autoware deployment on PCU
- Part 13 - 96boards: Autoware everywhere | Autoware.Auto 3D Perception Stack using k8s on PCU
- Part 14 - 96boards: Autoware everywhere | Multi-board Autoware.Auto 3D Perception Stack using k8s
- Part 15 - 96boards: Autoware everywhere | Updating Autoware.Auto 3D Perception Stack modules


