Introduction
Following our previous entries of the “96boards: Autoware everywhere” blog series where we focused on the Hikey970 we now move on to a different board, the Qualcomm® Robotics (RB3) Dragonboard-845c Development Platform.
As we did for the Hikey970 we will show how to run different subcomponents of Autoware on the RB3 platform. This post looks at how we can get Autoware.AI running on the board and is organized as follows:
Requirements
The steps outlined in this blog posts build up on our previous posts and as such you need to:
- Have your RB3 board running with Debian Buster as outlined here and with Docker installed.
- Be familiar with the work that we conducted previously within the “Autoware everywhere” series on Autoware.AI.
In addition, if you plan on developing real-time applications in the future your board should be running a RT-enabled kernel as we outlined here.
Getting the Docker image
Linaro’s Debian image is based on Debian Buster. At the time of writing Debian Buster is not a Supported platform for ROS2 Dashing Diademata. So we will make use of the pre-compiled Autoware.AI docker images for arm64 targets.
- We will first create a
shared_dirfolder that will be mounted as a volume inside the docker container:
$ mkdir ~/shared_dir
we will use this folder to store the rosbag demo data.
- Then clone the Autoware.AI’s
dockerrepository to make use of the convenience scripts:
$ git clone https://gitlab.com/autowarefoundation/autoware.ai/docker.git
$ cd docker/generic
$ ./run.sh -c off -i autoware/arm64v8 -t 1.13.0
Which will pull and run 1.13.0-melodic Autoware image. Once inside the container if we do ls we will see:
$ ls
Autoware  shared_dir
Getting the demo data
In addition to the Docker images we need to get the demo data for Autoware.AI’s rosbag demo and a yaml file containing basic parameters that need to be set up for a headless run. To do so:
$ cd ~/shared_dir
$ wget http://db3.ertl.jp/autoware/sample_data/sample_moriyama_data.tar.gz
$ wget http://db3.ertl.jp/autoware/sample_data/sample_moriyama_150324.tar.gz
$ tar xzf sample_moriyama_data.tar.gz
$ rm sample_moriyama_data.tar.gz
$ tar xzf sample_moriyama_150324.tar.gz
$ rm sample_moriyama_150324.tar.gz
$ wget http://people.linaro.org/~servando.german.serrano/autoware/headless_setup.yaml
Running the .AI Rosbag demo
We are now set to start with the rosbag demo. Let’s find out how far we can push the RB3 board.
NOTE: As happened with the Hikey970, due to memory constraints on the RB3 we will not be able to run all the rosbag demo components in the board. So we will run my_map.launch, my_sensing.launch and my_localization.launch in the board.
To change things a little we will check whether the ndt matching algorithm is successfully getting a pose using the ndt_matching_monitor node. If instead you want to visualize the demo output in a laptop you can follow the steps that we outlined for the Hikey970 here, since it will be the same.
To run the each component of the demo independently we will need 5 terminals where we have ssh’ed into the RB3.
In Terminal 1 we run our container and, within it, make an .autoware folder and copy the data folder over:
$ ./run.sh -c off -i autoware/arm64v8 -t 1.13.0
$ mkdir ~/.autoware
$ cp -r ~/shared_dir/data ~/.autoware/data
If you plan to run the visualization in a laptop or other board, you will need to set the needed environment variable as per ROS in Multiple Machines tutorial as we did here.
Now, in one of the other terminals we check the name of the created container, which will be something like:
$ docker ps
CONTAINER ID        IMAGE                             COMMAND                CREATED             STATUS              PORTS               NAMES
3dc4cbcd8519        autoware/arm64v8:1.13.0-melodic   "/tmp/entrypoint.sh"   39 seconds ago      Up 39 seconds                           CONTAINER_NAME
We can now access the same container on each of the terminals so that we do not need set the same environment variables on each individual container. On terminals 2 to 5 we do:
$ docker exec -it -u autoware CONTAINER_NAME /bin/bash
$ cd ~
$ source Autoware/install/setup.bash
We are now set to kick things off:
- Terminal 1
$ roscore &
$ rosparam load ~/shared_dir/headless_setup.yaml &
$ rosbag play --pause ~/shared_dir/sample_moriyama_150324.bag --clock
- Terminal 2
$ roslaunch autoware_quickstart_examples my_map.launch
- Terminal 3
$ roslaunch autoware_quickstart_examples my_sensing.launch
- Terminal 4
Due to the board constraints we need to select the OpenMP implementation of the ndt matching so the computational load is distributed between the available board cores. As an example, to do so we can modify directly the installed launch file as follows:
$ sed -i 's\<arg name="method_type" default="0" />\<arg name="method_type" default="3" />\g' ~/Autoware/install/lidar_localizer/share/lidar_localizer/launch/ndt_matching.launch
$ roslaunch autoware_quickstart_examples my_localization.launch
- Terminal 5
To check that the localization is running appropriately in the board we can do:
$ roslaunch lidar_localizer ndt_matching_monitor.launch &
$ rostopic echo /ndt_monitor/ndt_status
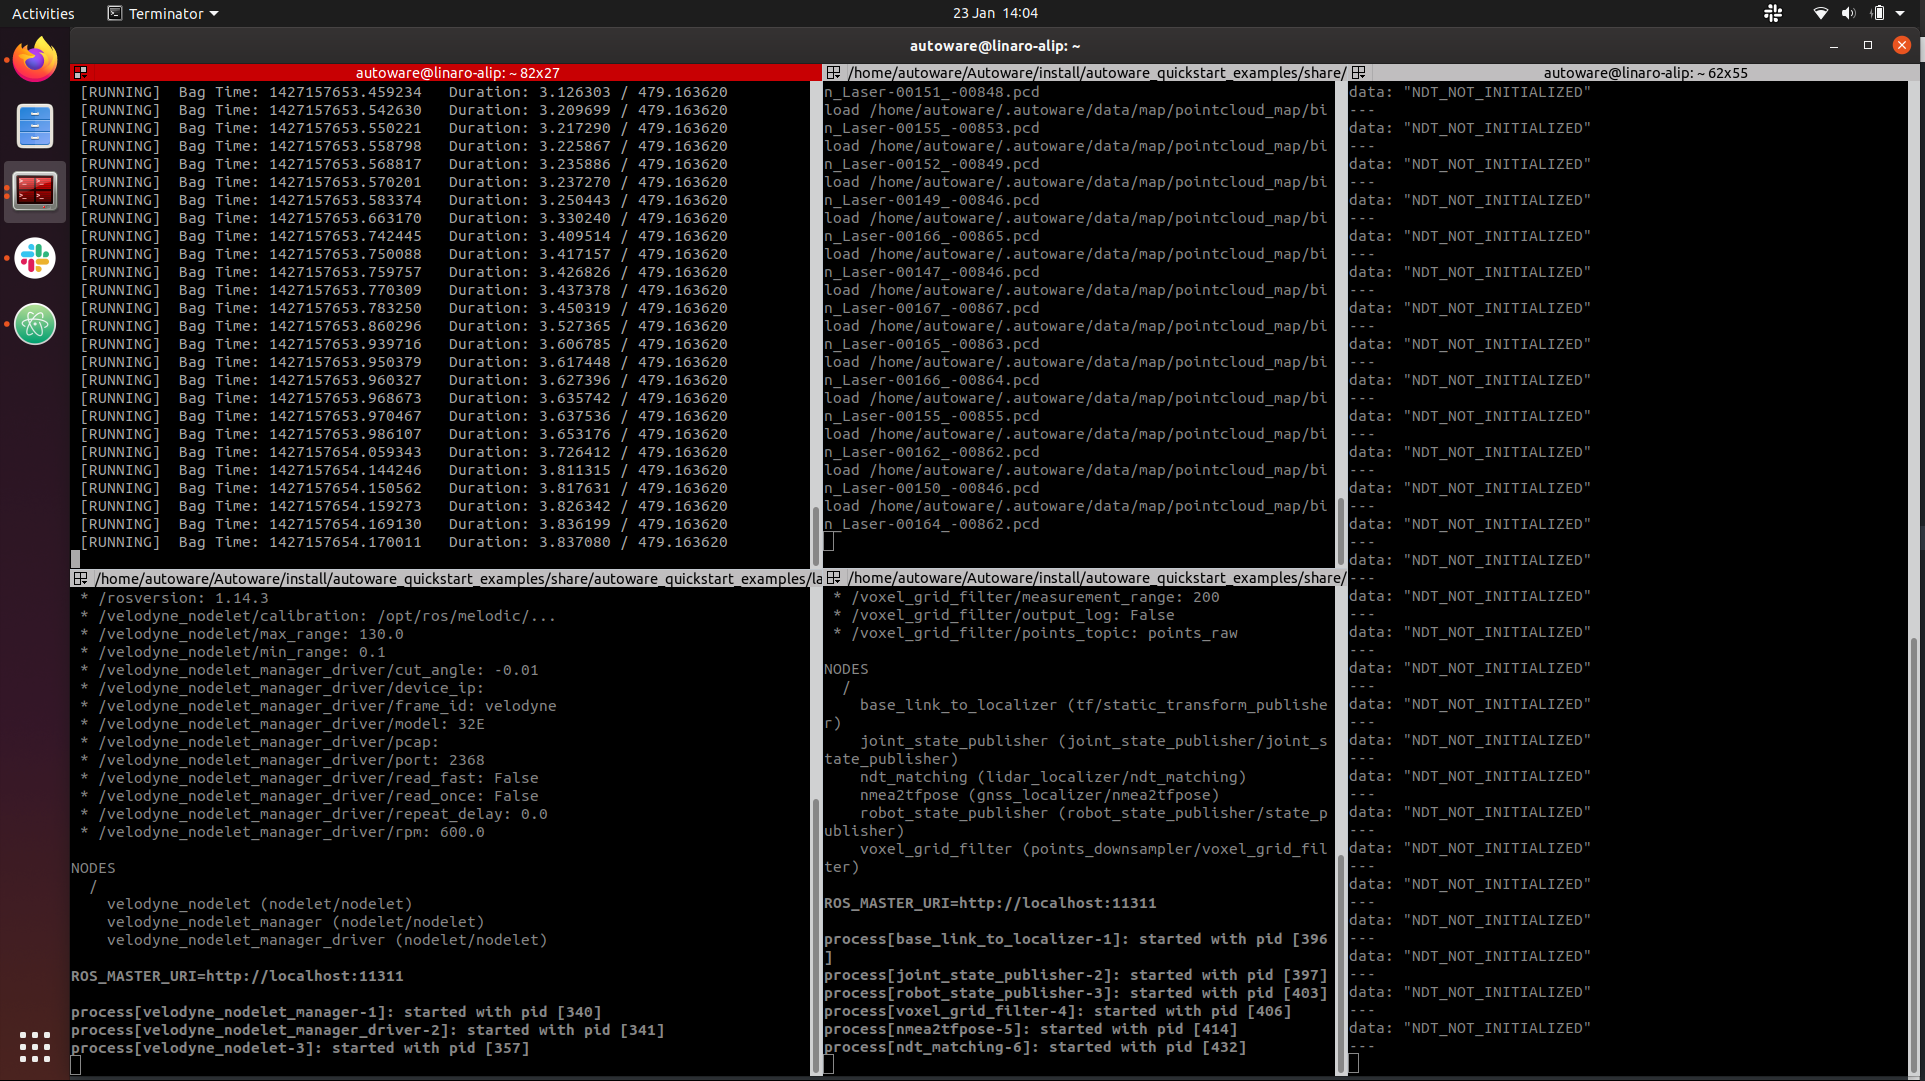
At the start the ndt_status will output NDT_NOT_INITIALIZED as shown in the image below.
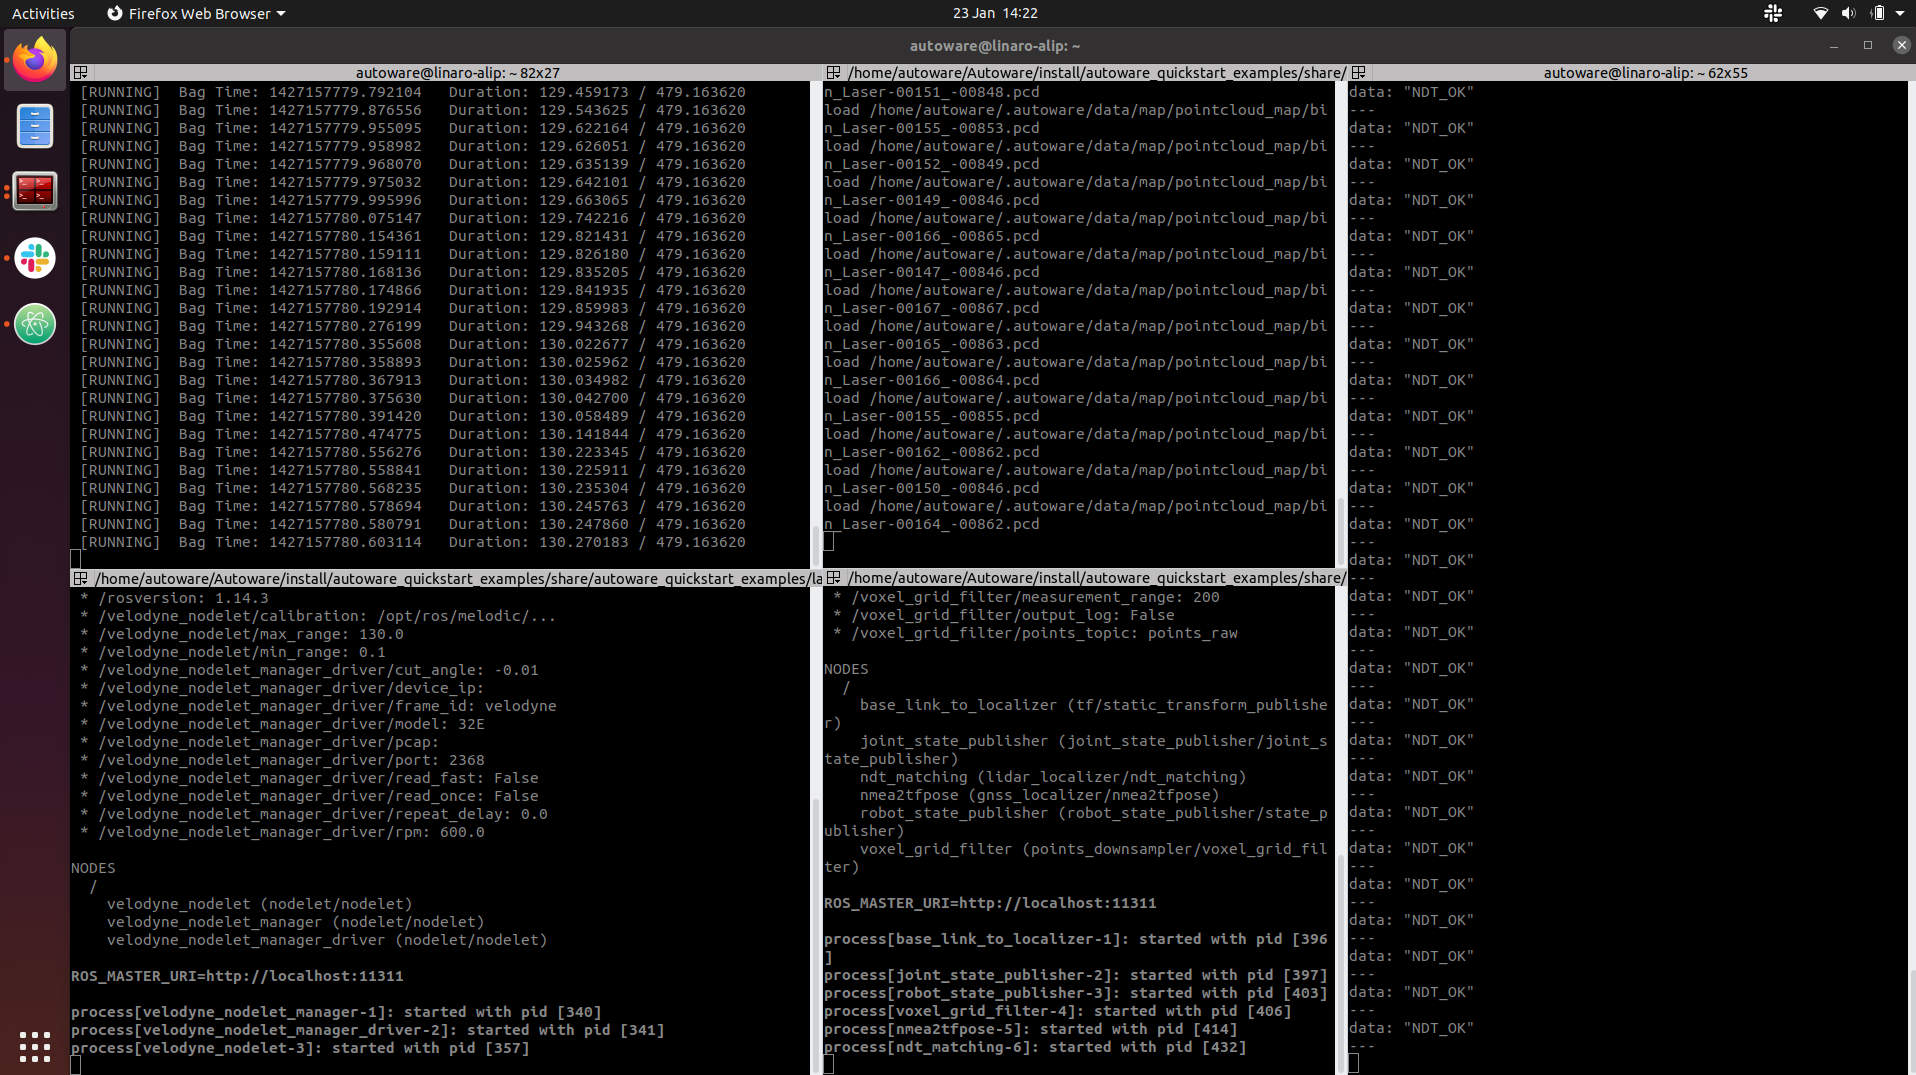
Once the ndt matching algorithm is able to localize based on the lidar readings and the pointcloud map you will see data: "NDT_OK" in the terminal as displayed in the next image.
NOTE It is possible that the ndt matching algorithm is not capable of localizing successfully. In this case you will see data: "NDT_ERROR" in the rostopic terminal.
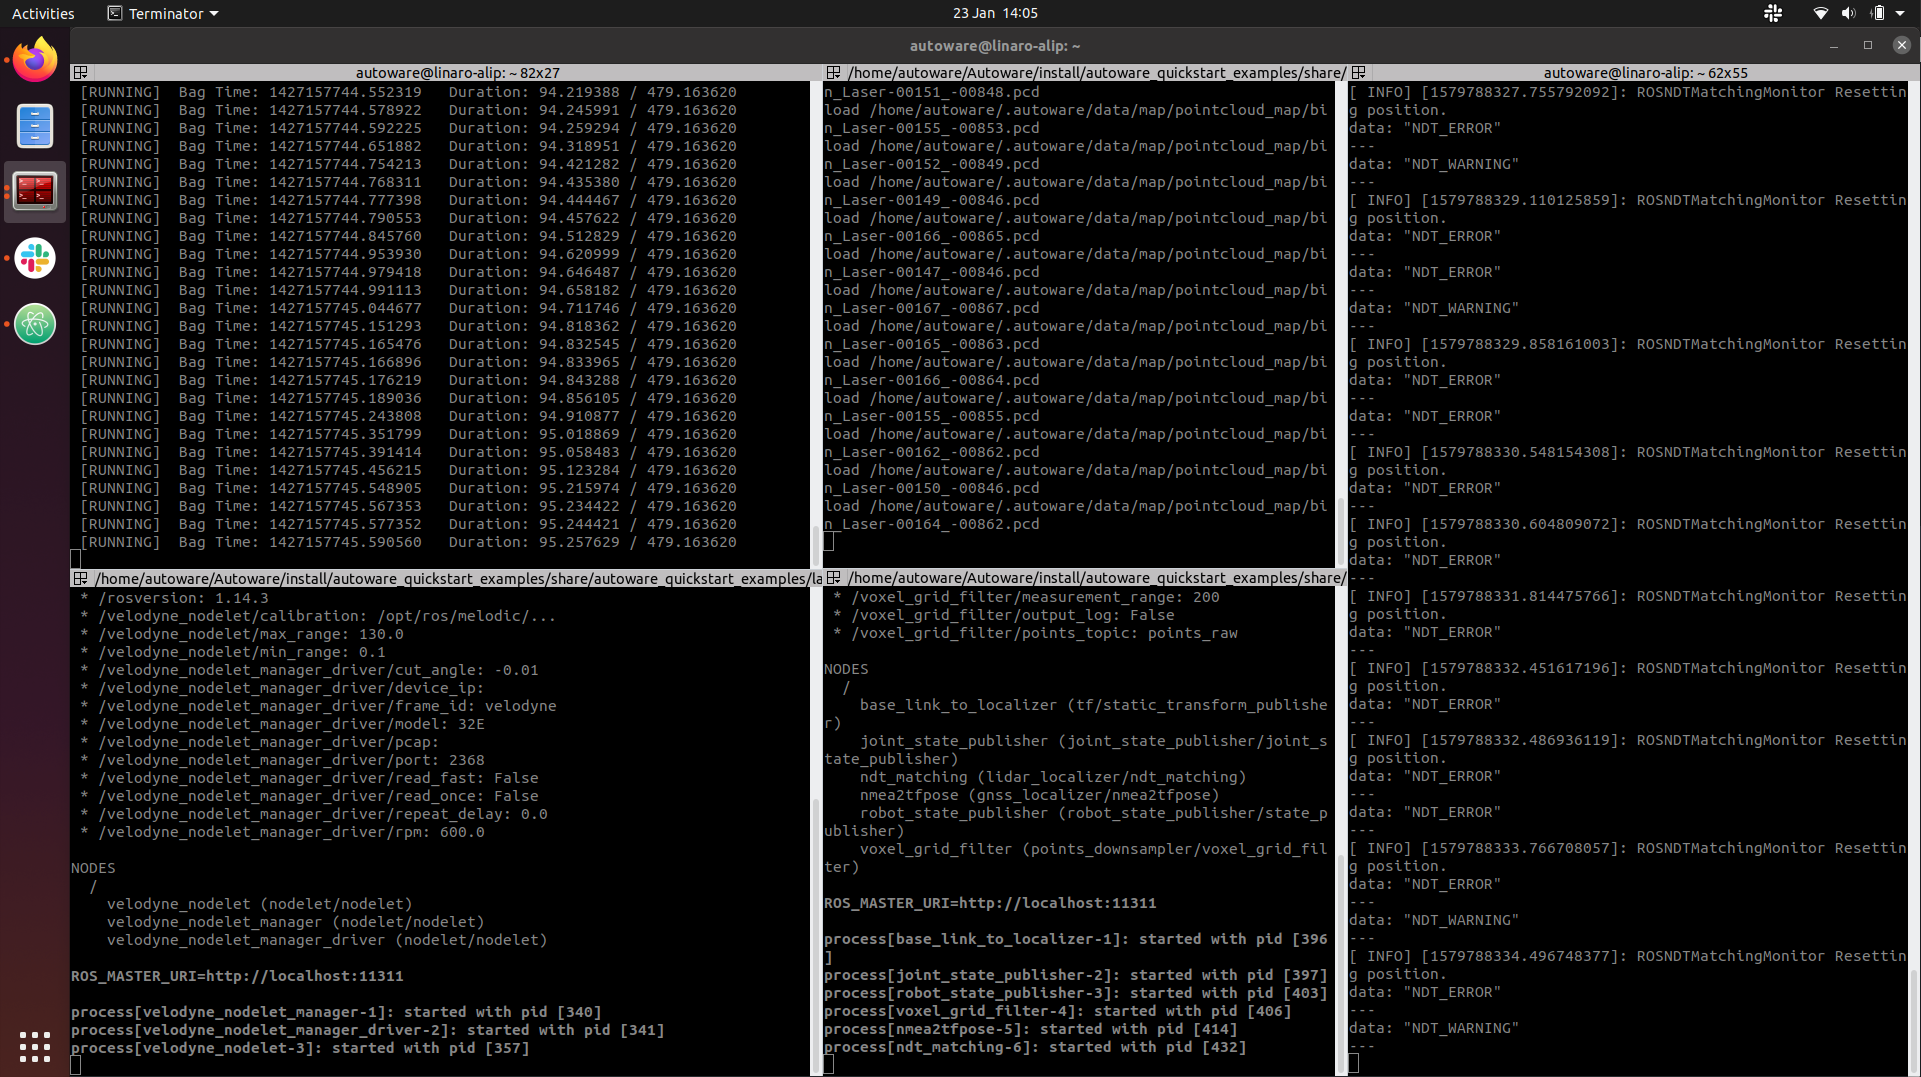
This might be due to the hardware requirements for running such computationally expensive algorithms as Autoware.AI algorithms have not been optimized to run on constrained hardware. It is worth noting that the re-writing effort that is being put into Autoware.Auto is likely to address these problems.
Conclusion
The “Autoware everywhere” blog series is aiming at deploying different components of Autoware on to different SoCs to prepare for the Heterogeneous platform from Autoware.IO. In this blog post we have investigated how we can run the localization component of Autoware.AI on the RB3 hardware.
With this post we are now in a suitable position to combine the Hikey970 and RB3 boards to fully run the Rosbag demo. We will show how we can do this in a future blog post.
Next time, we will give a go at Autoware.Auto on the RB3 and we will follow the Autoware.Auto 3D Perception Stack demo, so keep an eye to this space.
This article is Part 4 in a 15-Part Series.
- Part 1 - 96boards: Autoware everywhere | Autoware.AI and Hikey970
- Part 2 - 96boards: Autoware everywhere | Autoware.Auto and Hikey970
- Part 3 - 96boards: Autoware everywhere | Bridging .AI and .Auto in the Hikey970
- Part 4 - 96boards: Autoware everywhere | Autoware.AI and Dragonboard-845c
- Part 5 - 96boards: Autoware everywhere | Autoware.Auto, bridge with .AI and Dragonboard-845c
- Part 6 - 96boards: Autoware everywhere | Binding Autoware.AI nodes to CPUs
- Part 7 - 96boards: Autoware everywhere | Defaulting to Cyclone DDS
- Part 8 - 96boards: Autoware everywhere | First look at AutoCore's PCU
- Part 9 - 96boards: Autoware everywhere | meta-arm-autonomy in AutoCore's PCU
- Part 10 - 96boards: Autoware everywhere | Running Cyclone DDS on Kubernetes
- Part 11 - 96boards: Autoware everywhere | Xenomai on PCU
- Part 12 - 96boards: Autoware everywhere | K8s-based Autoware deployment on PCU
- Part 13 - 96boards: Autoware everywhere | Autoware.Auto 3D Perception Stack using k8s on PCU
- Part 14 - 96boards: Autoware everywhere | Multi-board Autoware.Auto 3D Perception Stack using k8s
- Part 15 - 96boards: Autoware everywhere | Updating Autoware.Auto 3D Perception Stack modules